Export Data to CSV File and Send It in an E‑mail

Large corporations often use some type of “custom-made” system, designed to support the specific needs of the organization. As a result, the number of features and reports can be limited due to cost. When specific data is needed and there is no report, the report can be created using a reporting tool (when available) or a way of providing the information is done by extracting it directly from the database.
In past, when I was an employee of a service provider, I received requests from customers for information that were not avaialable in any report of our specific system. The only way to quickly provide the information was querying the database. As some requests for the same information were frequent, the solution was to automate.
Solution Overview
As per title of this post, I will show you how to extract data from the database and send it in an e-mail. An easier and often prefered way is to make the CSV file available in a shared folder, but for the purpose of this tutorial, I chose to send an e-mail with the CSV file attached.
There are several ways to accomplish this task and the use of ETL tools such as Talend Open Studio, SSIS (SQL Server Integration Services), etc. is also simple; however, doing it through batch files and command line tools can be quite flexible and accomplished in very little time. This task could also be done easily using R or Python, but not everyone twho works with databases can code or is familiar with these programming languages.
The solution I will describe is extremely simple and allows you to generate new extractions in just a few minutes, so let me describe what you will see here:
- The steps to install the Oracle and SQL Server command line tools on Windows and Linux
- Utilities and Scripts to export data to CSV file
- Scheduling the data extraction to run at a specific time
- E-mailing a file on Windows and Linux
- Adding a chart to the e-mail (Using R)
- Creating an XLSX file from a CSV file (Using R)
I would like to mention that it is also simple to extract data using command line tools from MySQL, SQLite and others databases, but to avoid this post being much longer, I decided to choose the big ones.
For this tutorial, I will be accessing following databases:
- Oracle 18C Express Edition (XE)
- SQL Server 2019
And the following operating systems will be used to run the tools and scripts:
- Ubuntu Desktop 20.04 LTS
- Windows 10
Note: I am using simple desktop operating systems to retrieve the data, but the same steps (with minor changes) can also be performed on Linux server editions (e.g. Red Hat Enterprise Linux Server, SUSE Linux Enterprise Server, etc.) and also on Windows Server editions.
1 - Installing Database Command Line Tools
The first step is to install sqlcmd Utility (SQL Server) and SQL*Plus (Oracle) to query the database using the command line.
1.1 - Installing SQL Server SQLCMD Utility on Windows
Detailed information about the installation, syntax, etc. of sqlcmd Utility sqlcmd can be found in Microsoft SQL Docs, but the simple information here should be sufficient to complete the installation.
To begin, download the Command Line Utilities from Microsoft SQL Docs according to your Windows version. Use (x86) if your Windows is 32-bits and (x64) in case your Windows is 64-bit. As instructed, Windows Installer 4.5 and Microsoft ODBC Driver 17 for SQL Server components are required. On Windows 10 you probably won’t need to download and install Windows Installer 4.5, but you will need to install Microsoft ODBC Driver 17 for SQL Server (if not already installed).
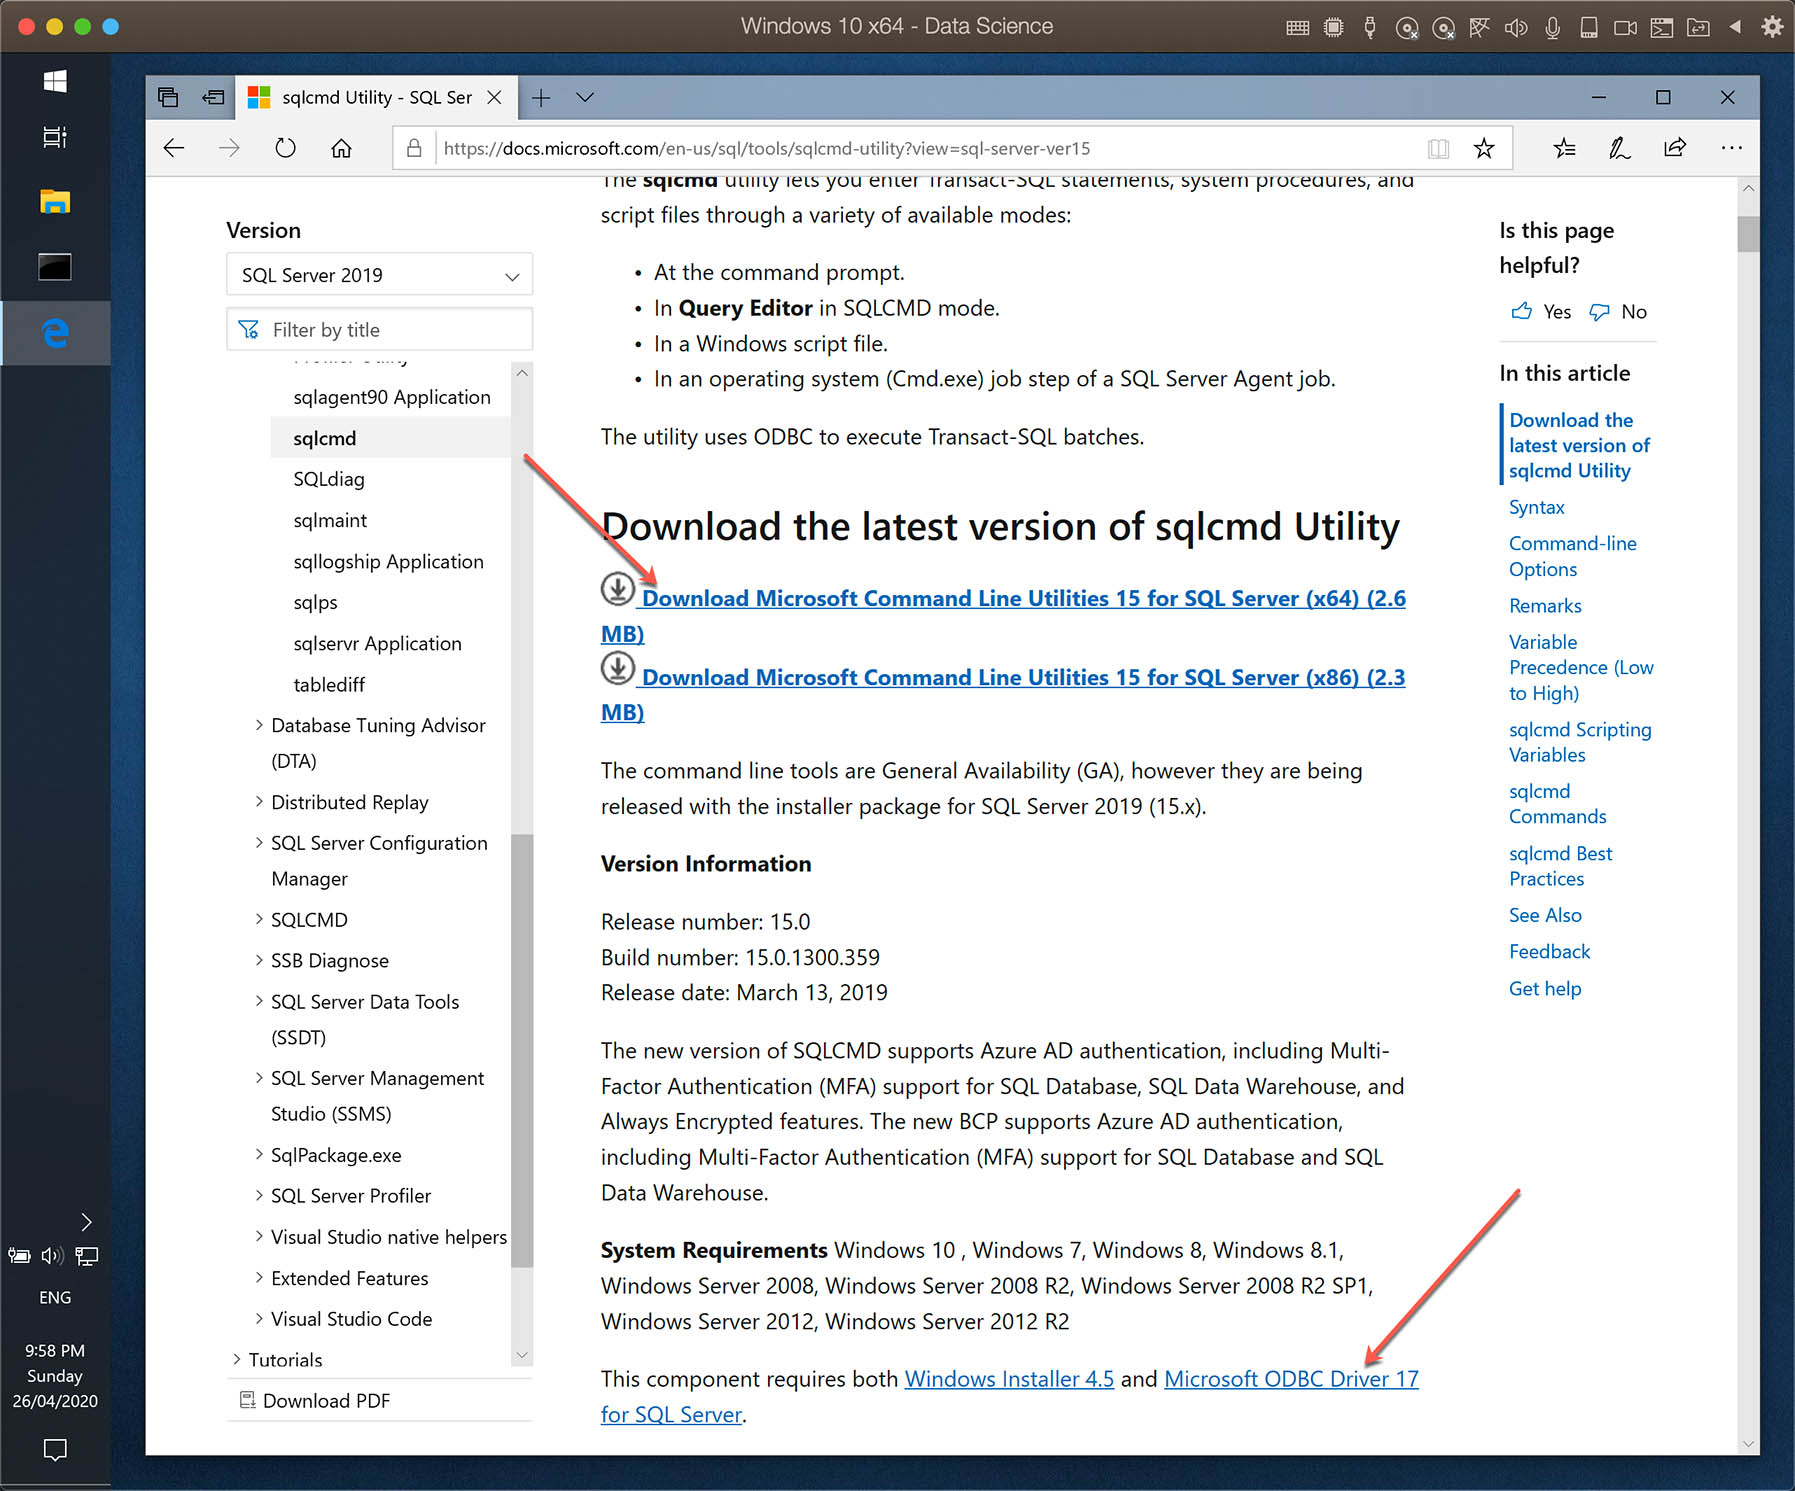
To install Microsoft ODBC Driver 17 for SQL Server, you will need to have the Visual C++ 2017 Redistributable installed. You can find and download from here.
Now, just follow the simple steps for the msodbcsql.exe and msodbcsql.exe installations.
After installation, you should be able to open the command prompt and run sqlcmd.

The syntax of sqlcmd is explained in Microsoft SQL Docs webpage. In the screenshot above, you will see that I used following command line options:
- Server’s IP address or hostname
- User
- Password
- Database
- Query script
In my test environment, I ran the following command:
sqlcmd -S 192.168.0.169 -U Tutorial -P "Tutorial.123!" -d sakila -Q "SELECT TOP 5 actor_id, first_name, last_name FROM actor order by first_name;"
1.2 - Installing SQL Server SQLCMD Utility on Linux
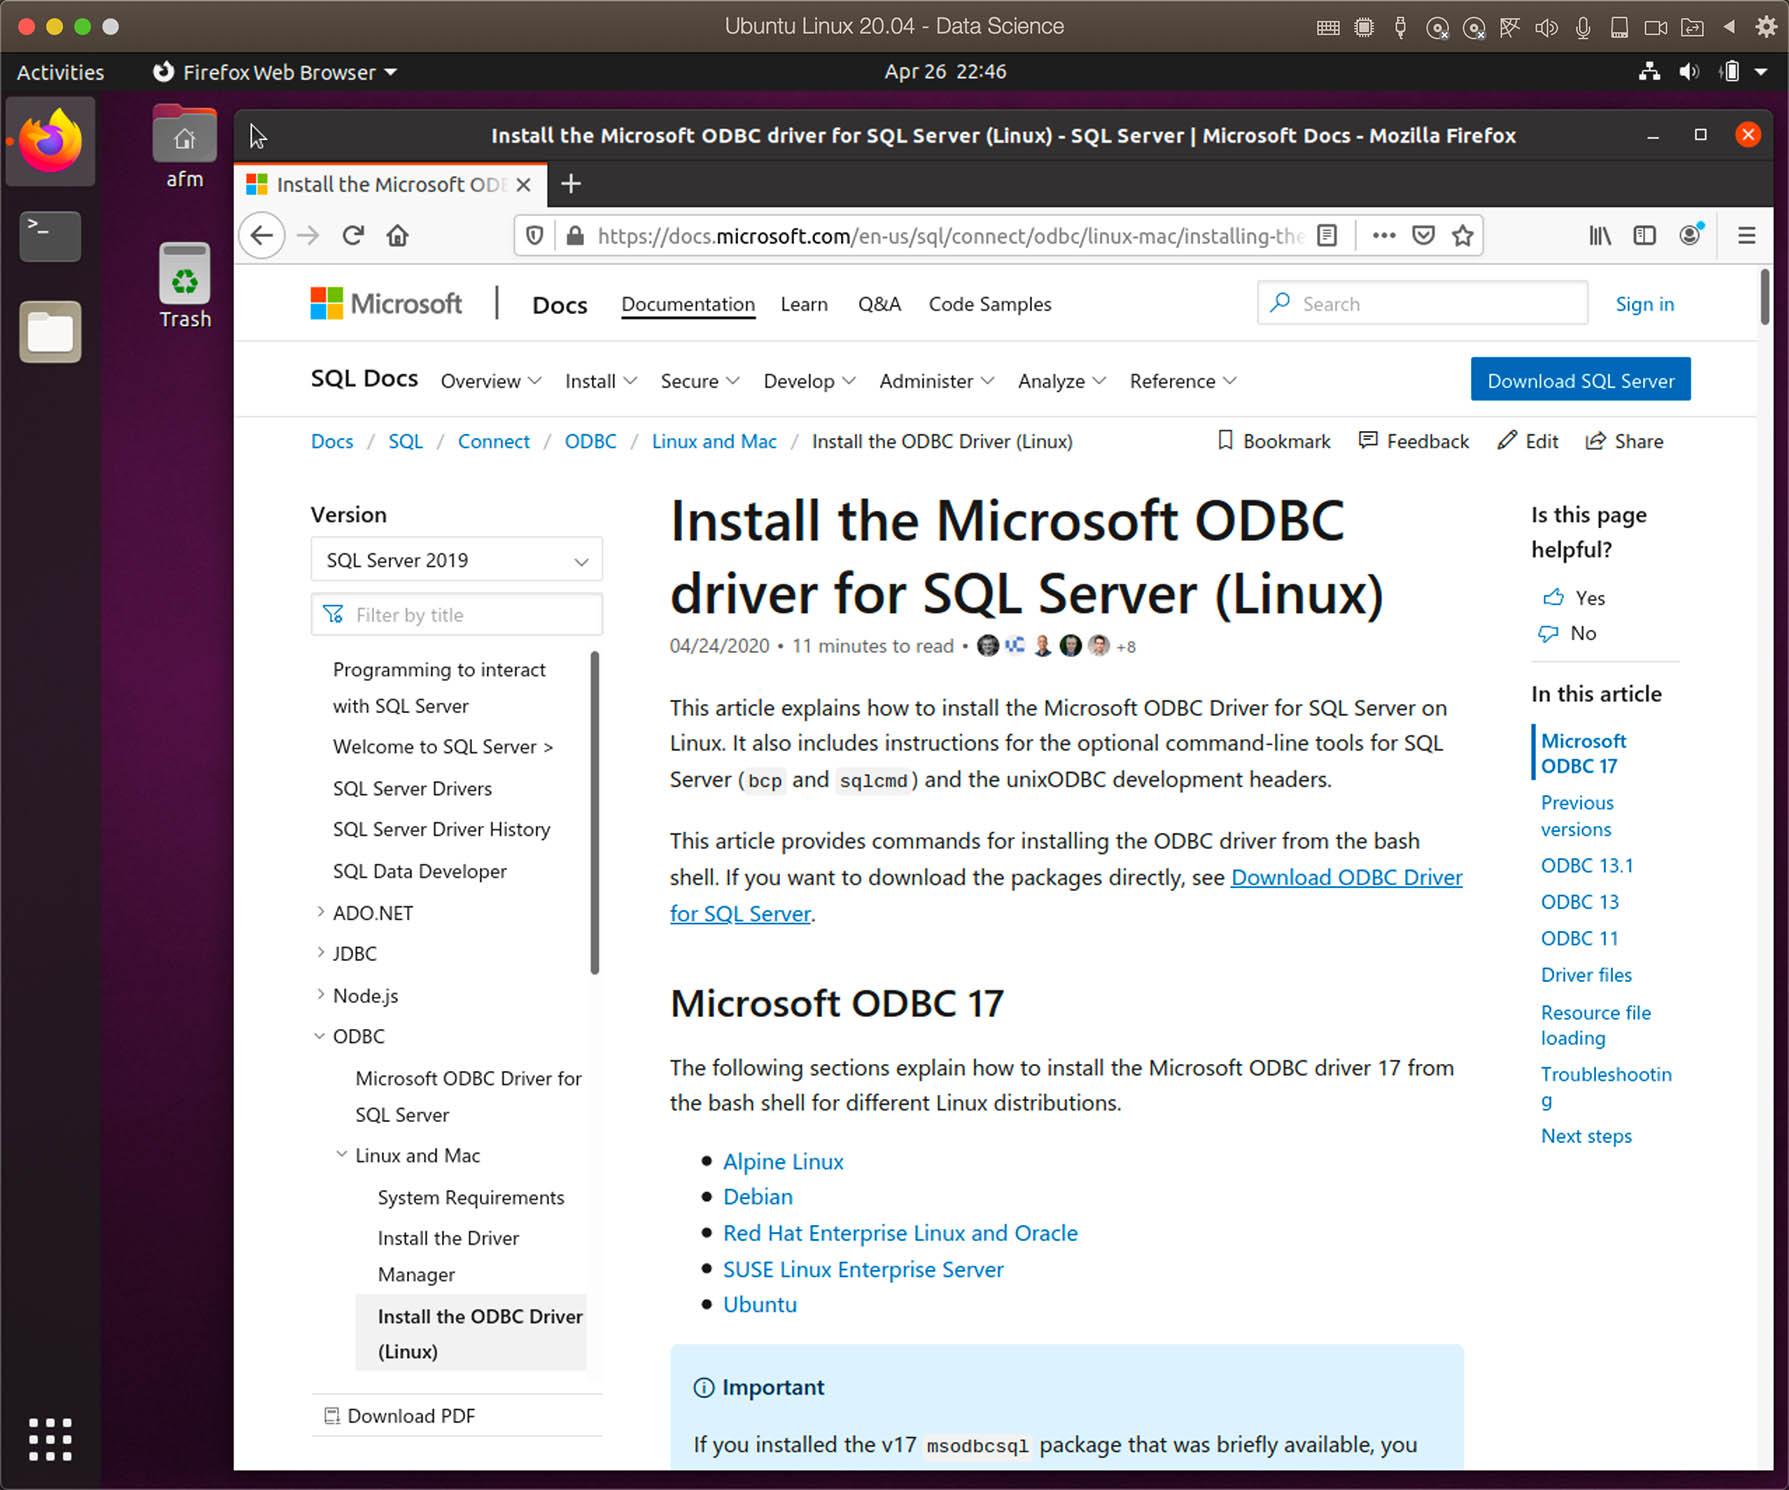
The installation details for sqlcmd on Linux is also well detailed and can be found in Microsoft SQL Docs.
The instructions use curl and it is not installed by default in Ubuntu 20.04. So use the command below to install curl:
sudo apt-get update
sudo apt-get install curl
curl is a tool to transfer data from or to a server, using one of the supported protocols (DICT, FILE, FTP, FTPS, GOPHER, HTTP, HTTPS, IMAP, IMAPS, LDAP, LDAPS, POP3, POP3S, RTMP, RTSP, SCP, SFTP, SMTP, SMTPS, TELNET and TFTP). The command is designed to work without user interaction.
Source: Ubuntu Manual - curl
Import the public repository GPG keys from Microsoft.
curl https://packages.microsoft.com/keys/microsoft.asc | sudo apt-key add -
Register the Microsoft Ubuntu repository as below. Note that I am using the Ubuntu 19.10 repository, as mssql-tools was not currently available on 20.04.
# Not available yet:
# curl https://packages.microsoft.com/config/ubuntu/20.04/prod.list | sudo tee /etc/apt/sources.list.d/msprod.list
# Using Ubuntu 19.10 repository:
curl https://packages.microsoft.com/config/ubuntu/19.10/prod.list | sudo tee /etc/apt/sources.list.d/msprod.list
Before installing mssql-tools, update the sources list and run the installation command for mssql-tools with unixodbc-dev (unixODBC developer package).
sudo apt-get update
sudo apt-get install mssql-tools unixodbc-dev
Continuing to follow Microsoft’s instructions, to make sqlcmd accessible from the bash shell for interactive/non-login sessions, modify the PATH in the ~/.bashrc file with the following command:
echo 'export PATH="$PATH:/opt/mssql-tools/bin"' >> ~/.bashrc
source ~/.bashrc
To test, you can run the same command as on Windows:
sqlcmd -S 192.168.0.169 -U Tutorial -P "Tutorial.123!" -d sakila -Q "SELECT TOP 5 actor_id, first_name, last_name FROM actor order by first_name;"

1.3 - Installing Oracle SQL*Plus on Windows
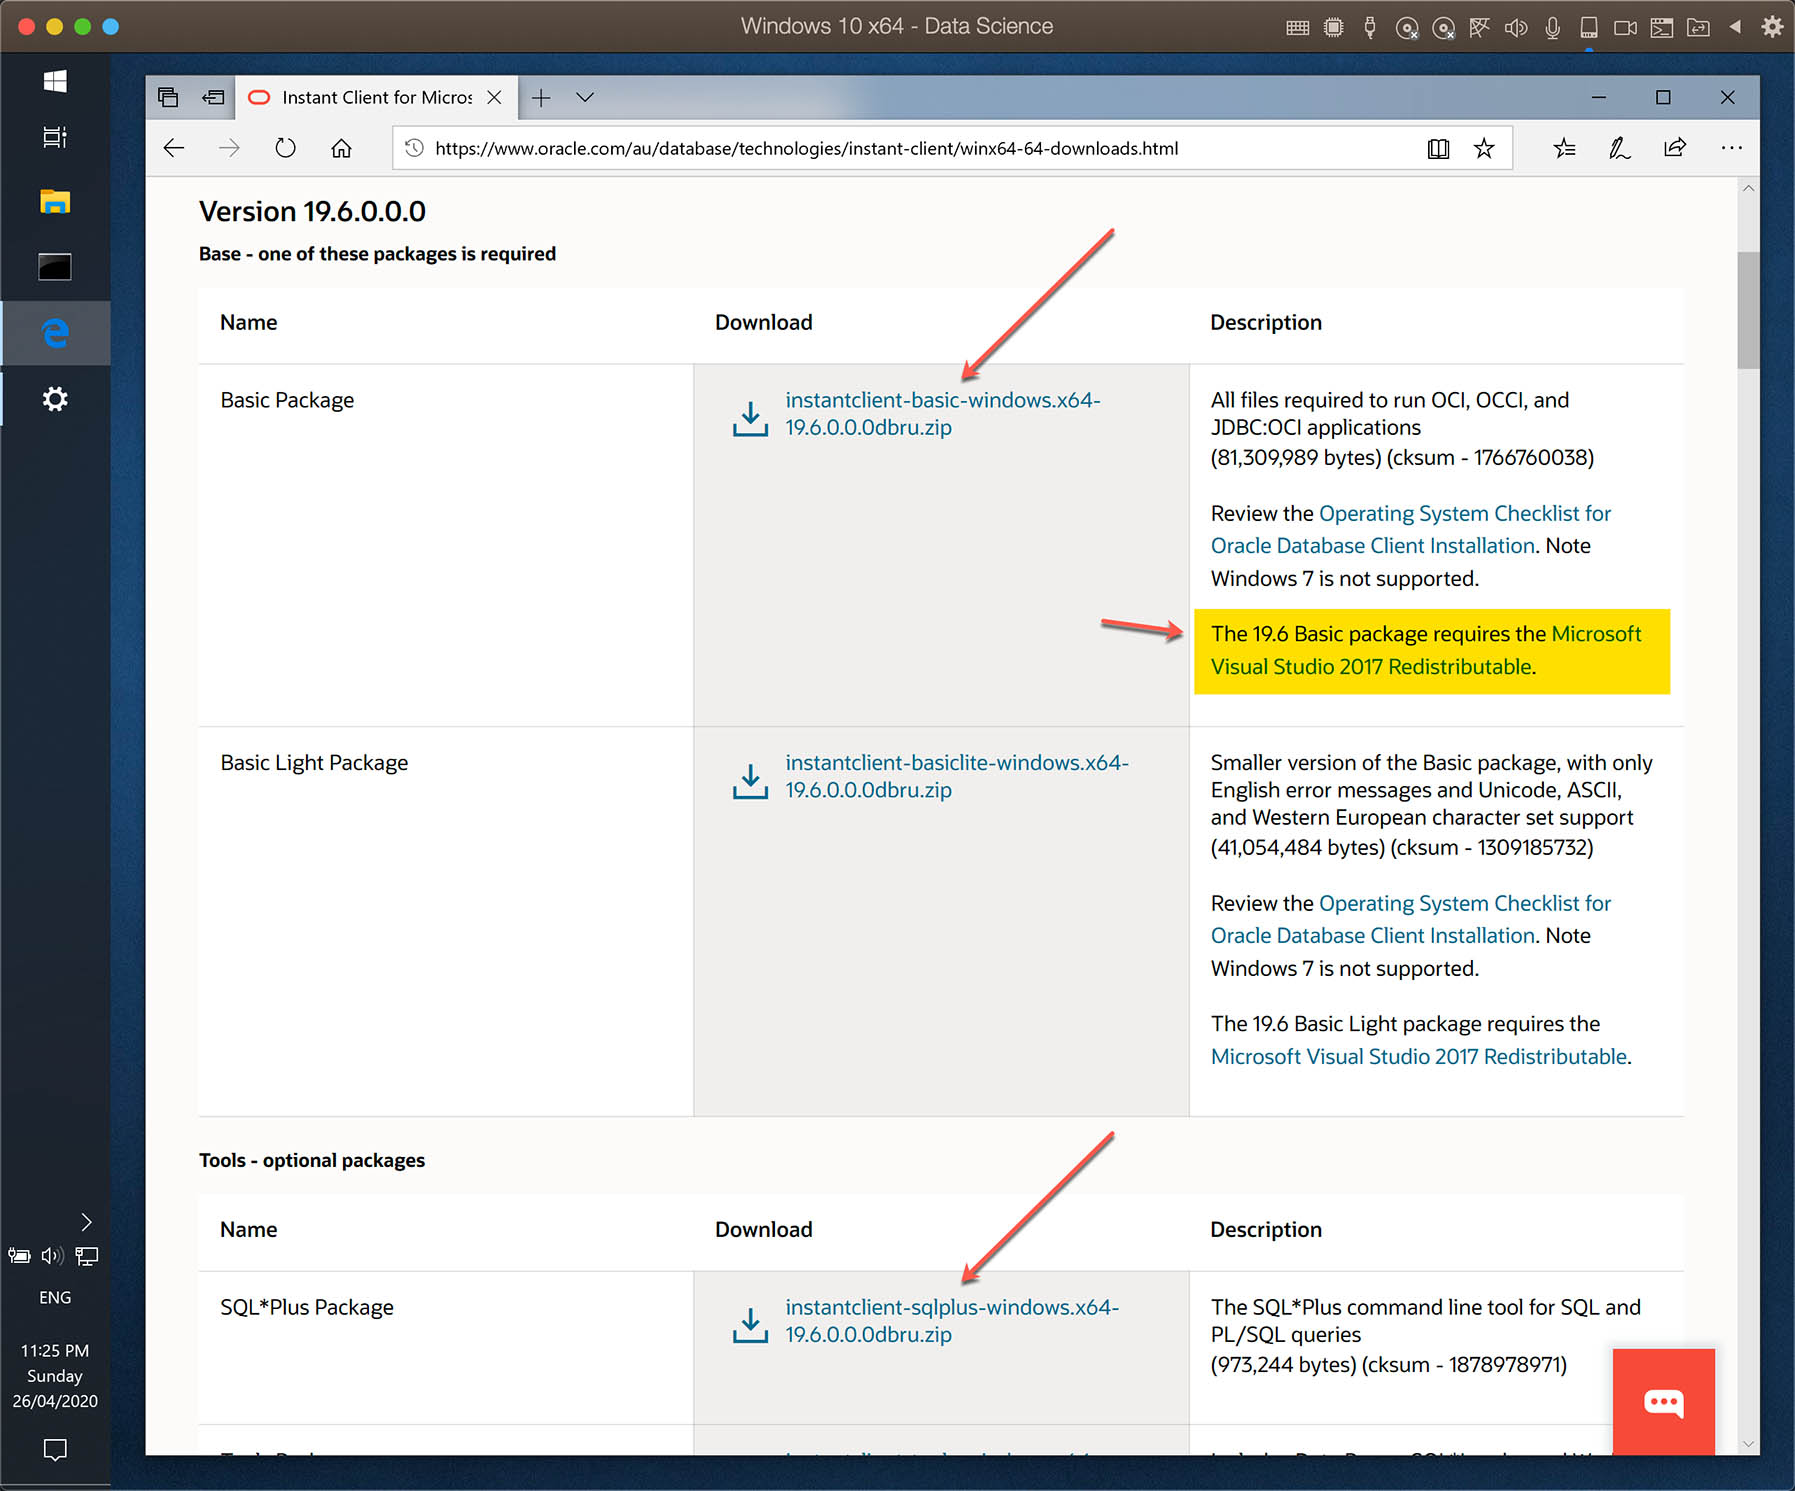
To use SQL*Plus on Windows, you will need the Oracle Client or the much smaller Instant Client. The installation of the full Oracle Client is simple. In this tutorial I will use the Instant Client, because, for our purpose, the same is sufficient.
In addition to the Instant Client, we will also need to download the SQL*Plus package to use with the Instant Client.
Here is the link to Oracle’s website to download the 64-bit version of the Instant Client and the SQL*Plus Package: https://www.oracle.com/au/database/technologies/instant-client/winx64-64-downloads.html
The website for the 32-bit version is: https://www.oracle.com/au/database/technologies/instant-client/microsoft-windows-32-downloads.html
After downloading two files, I suggest unzipping them in the C:\Oracle folder.

To use Oracle Instant Client on Windows, you will need to have the Visual Studio 2017 Redistributable installed. It is the same installation file that was also required for sqlcmd. You can find and download from here.
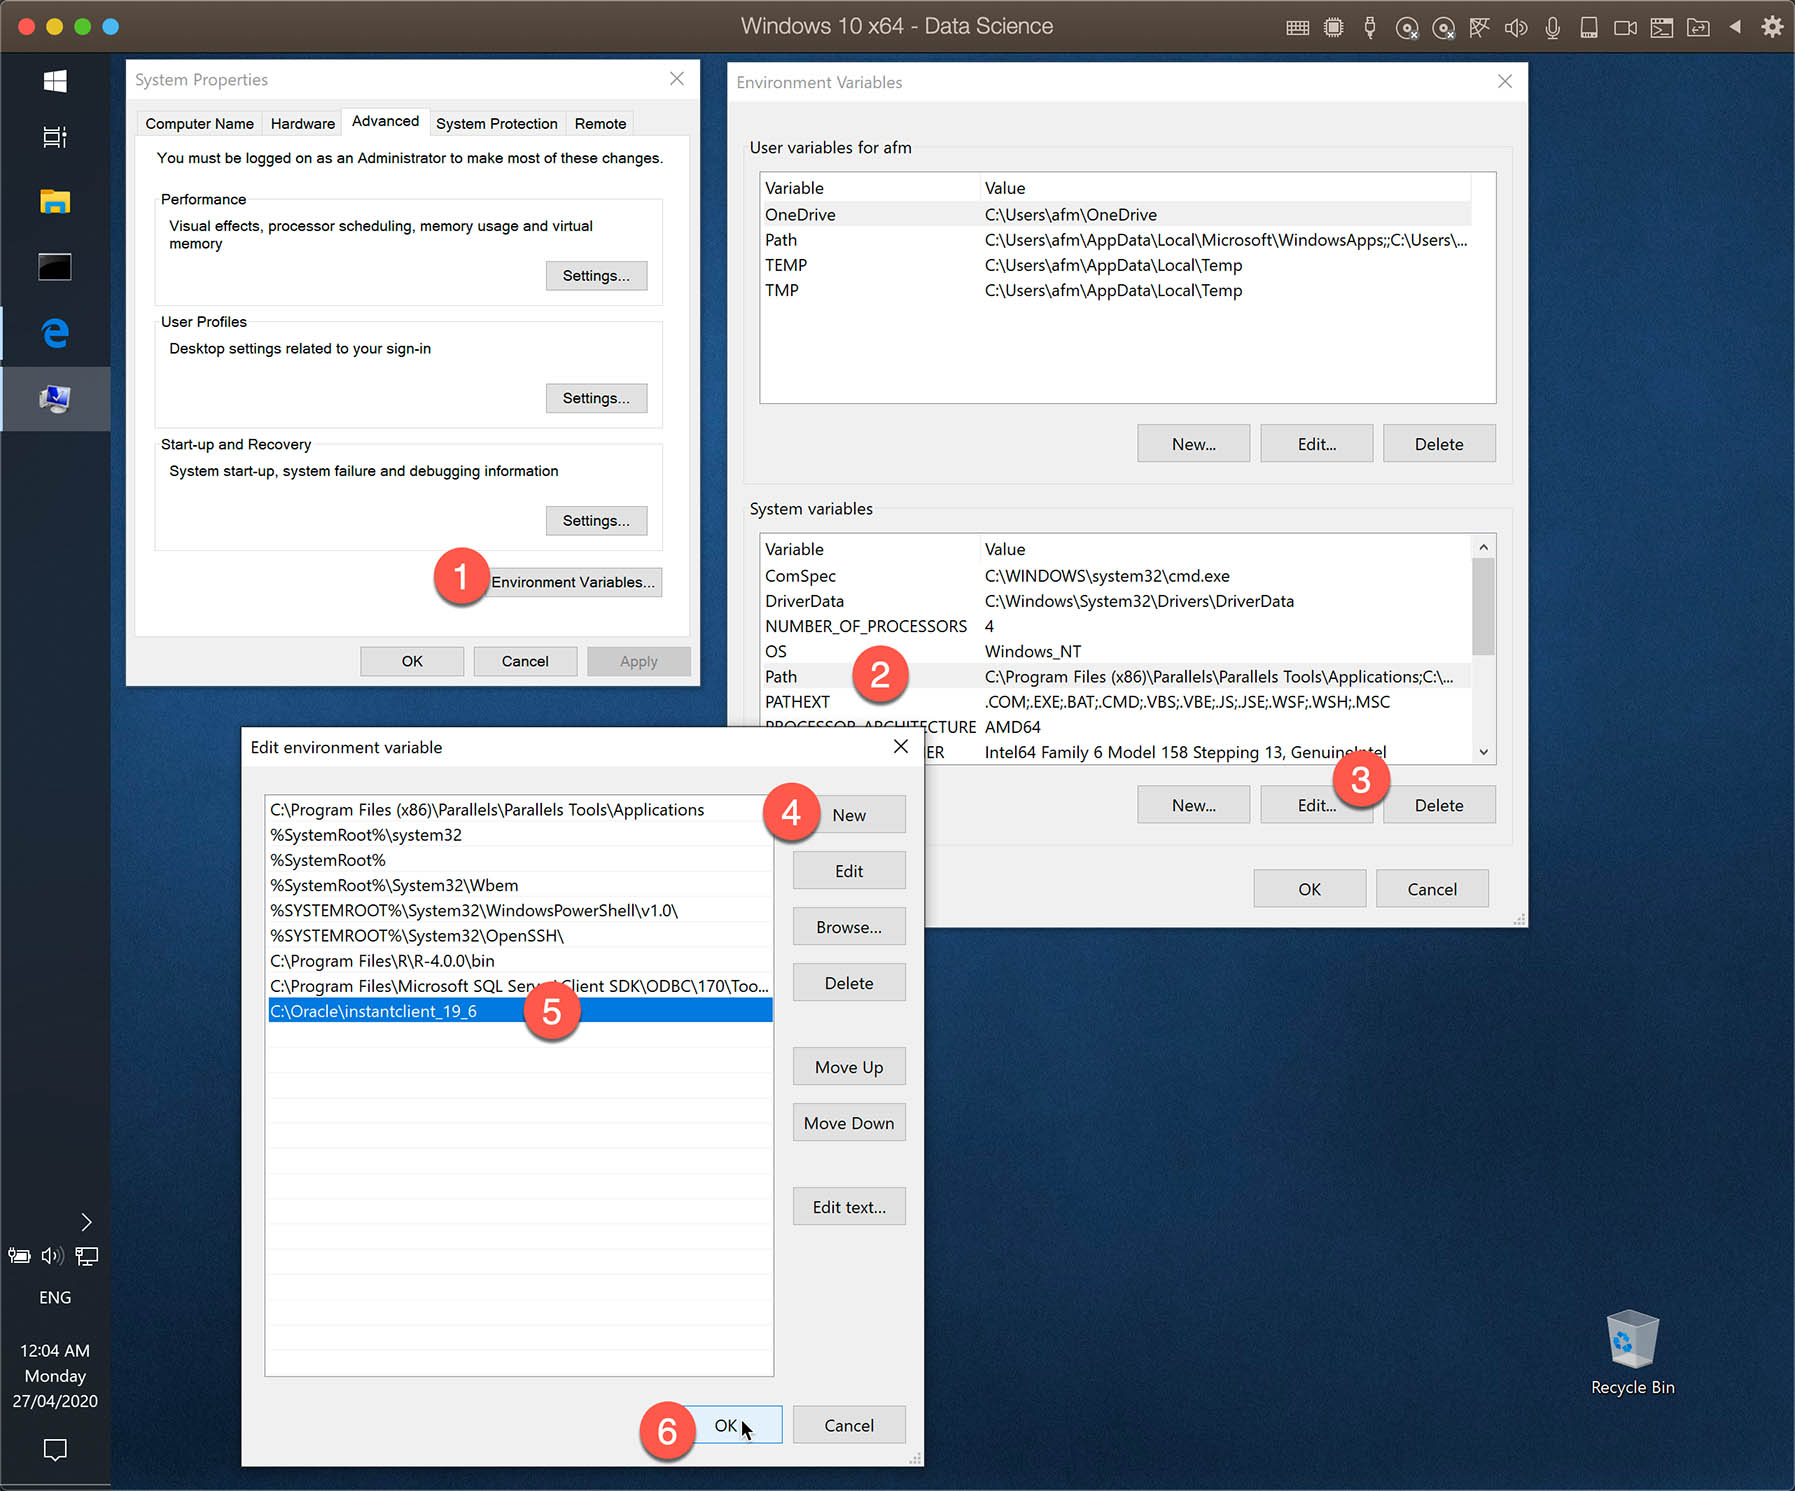
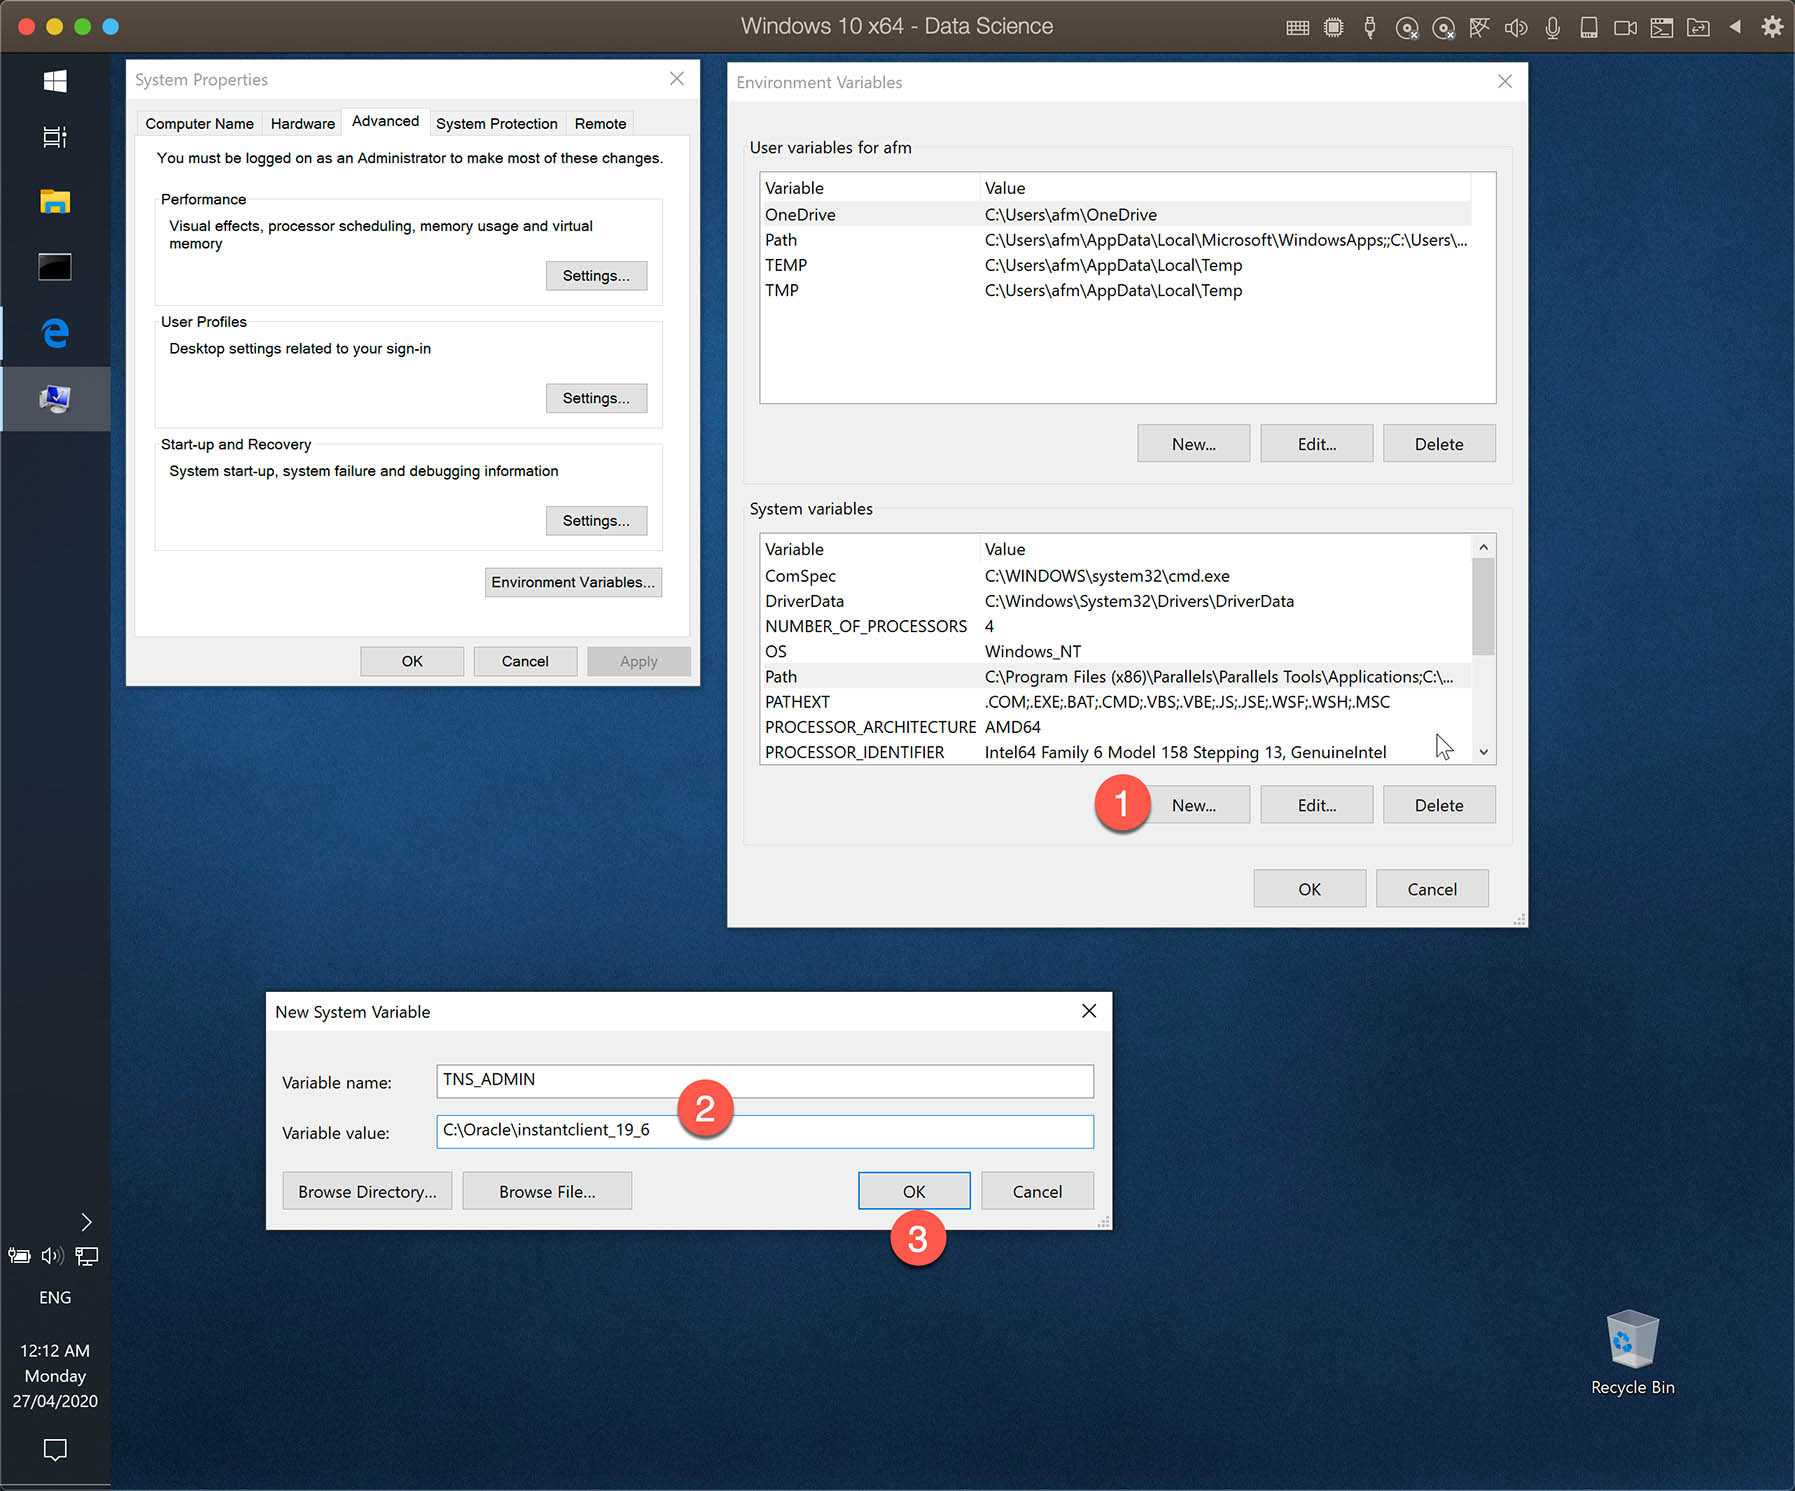
We start by adding the Instant Client folder to the windows PATH environment variable, so we can use the SQL*Plus from any other directory.
On Windows Start menu, start typing “Environment” and you should see “Edit the system environment variables".

Now follow the steps:
- Click at the button “Environment Variables…”
- Select the Variable “Path” under “Systems variables”
- Click on “Edit…”
- Click on “New”
- Write down the folder where the Instant Client is located
- Click on “OK”
You will also need to create a new System Variable named TNS_ADMIN to describe the location of a file called tnsnames.ora. This file is usually located at “ORACLE HOME\NETWORK\ADMIN”. As I am using an Instant Client, I decided to put this file in the same as the Instant Client (more about the tnsnames.ora file later).
- Under “Systems variables” click on “New”
- Write down the variable name TNS_ADMIN and for the value you use the Instant Client folder
- Click on “OK”
The last step before we can use the SQL*Plus is to add the file tnsnames.ora to the Instant Client folder.
TNSNAMES.ORA is a SQL*Net configuration file that defines databases addresses for establishing connections to them. This file normally resides in the ORACLE HOME\NETWORK\ADMIN directory, but location can be defined by the TNS_ADMIN environment variable
Source: Oracle FAQ
As mentioned above, it is a file (text file) with the database addresses. I suggest that you ask your DBA for the database details. In my test environment, the content of tnsnames.ora is:
XE =
  (DESCRIPTION =
    (ADDRESS_LIST =
        (ADDRESS =
          (PROTOCOL = TCP)
          (Host = 192.168.0.169)
          (Port = 51521)
        )
    )
    (CONNECT_DATA = (SID = XE)
    )
  )
Now, just use the command sqlplus in a command prompt and connect to your database. I suggest reading the Oracle Documentation about SQL*Plus to familiarize yourself with SQL*Plus.
One option to connect to the database is using the format:
sqlplus username[/password]@connect_identifier
Example:
sqlplus tutorial/"Tutorial.123!"@XE
The same query used above in SQL Server is slightly different in Oracle:
select * from (select actor_id, first_name, last_name from sakila.actor order by first_name) where ROWNUM <= 5;

To use SQL*Plus in Command Prompt, the steps above do the job. However, other software may need to read some settings from registry. If you have an issue with other software, then have a look at: https://stackoverflow.com/questions/5809195/installing-oracle-instant-client
1.4 - Installing Oracle SQL*Plus on Linux
To use SQL*Plus on Linux, you will also need a Oracle Client. Same as on Windows, I suggest installing the Instant Client.
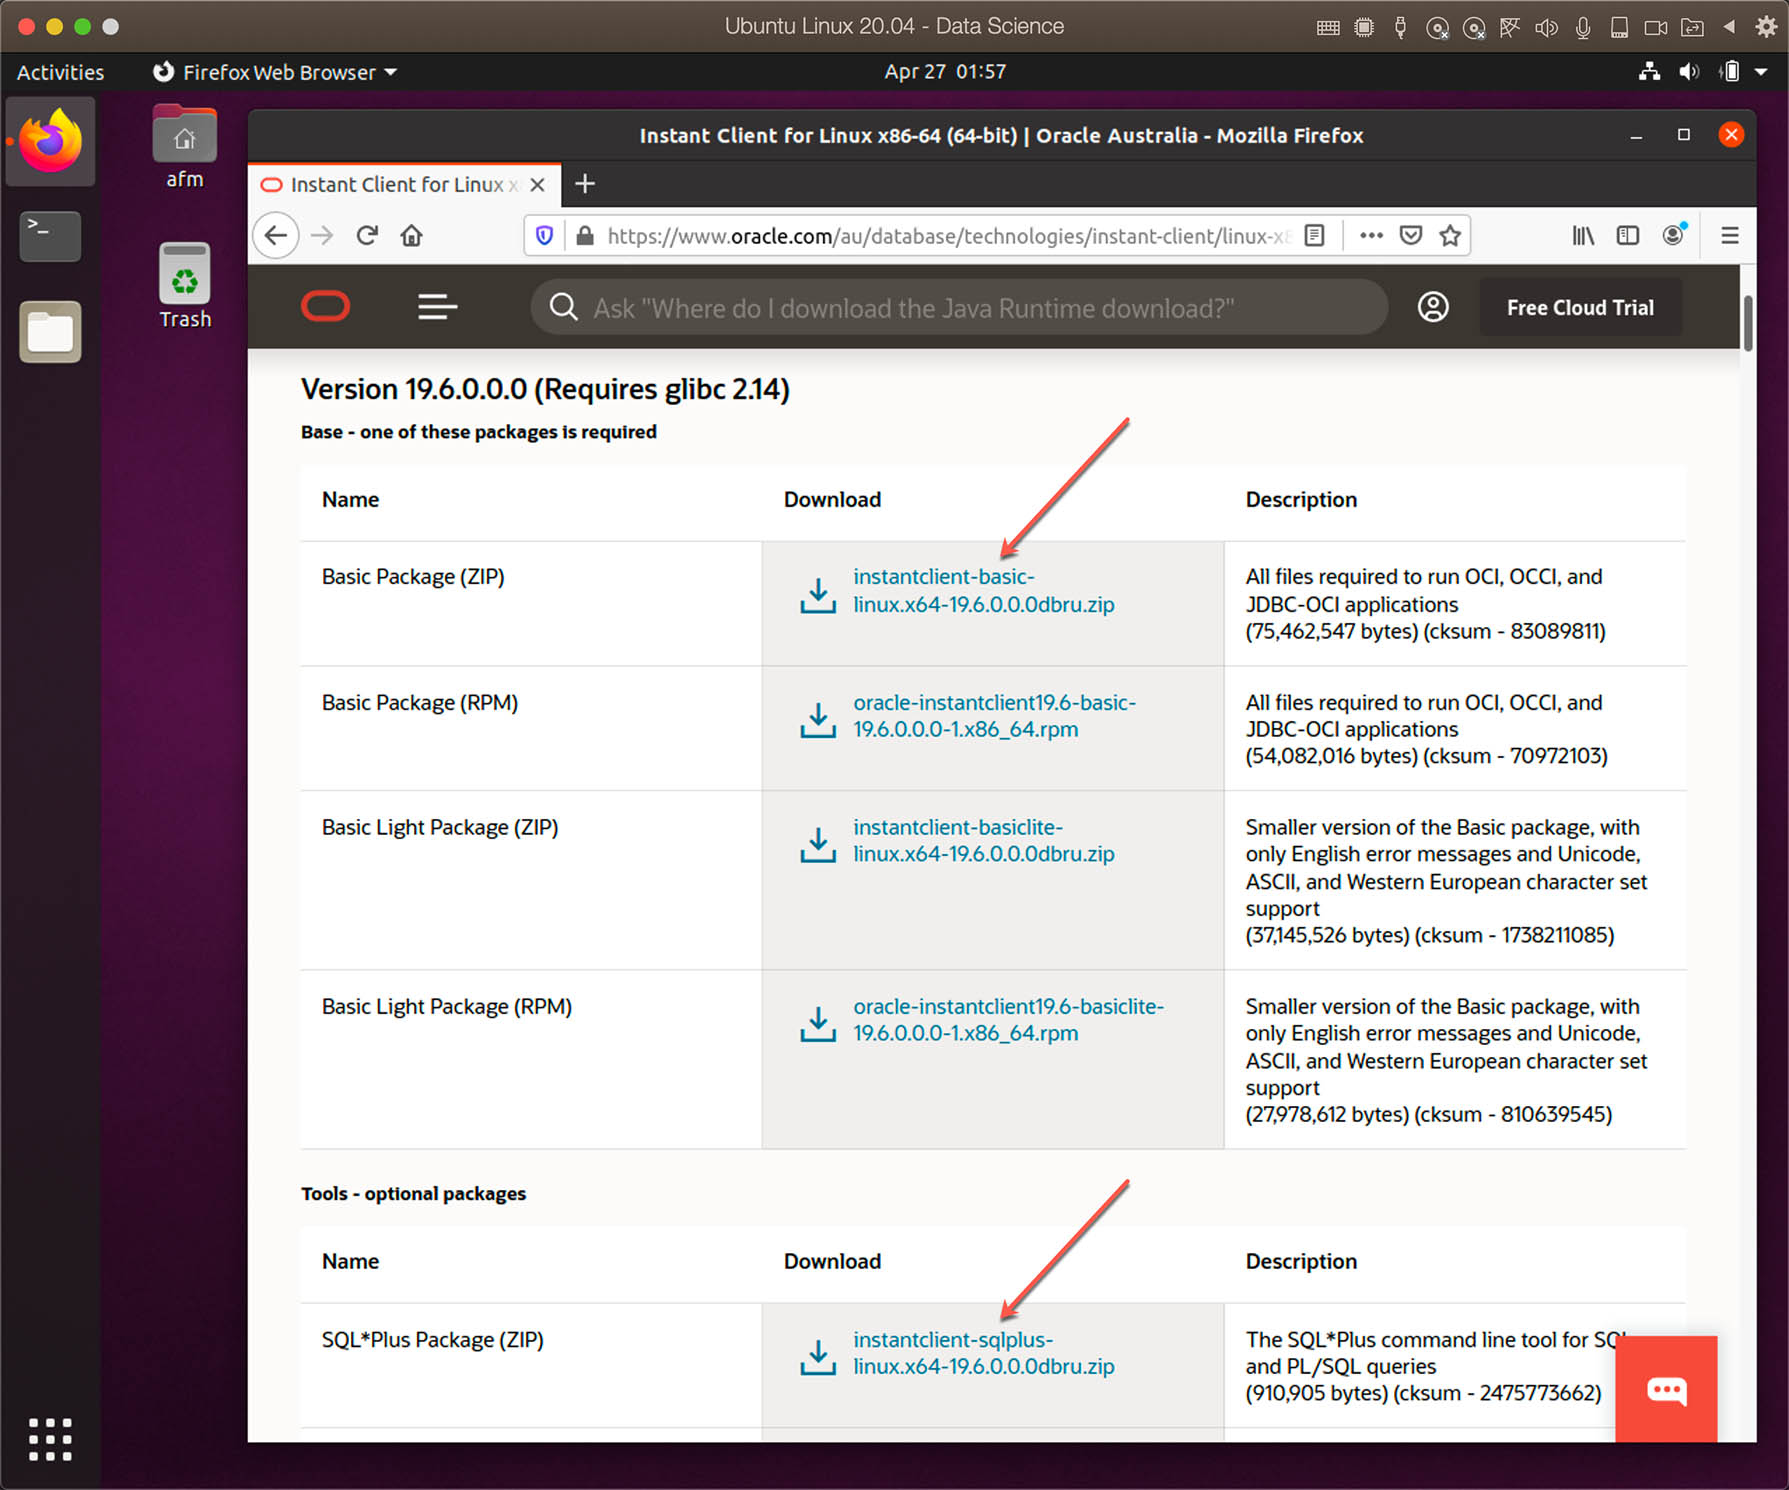
The 64-bit version of the Instant Client and SQL*Plus for Linux can be downloaded at: https://www.oracle.com/au/database/technologies/instant-client/linux-x86-64-downloads.html
The 32-bit version can be downloaded at: https://www.oracle.com/database/technologies/instant-client/linux-x86-32-downloads.html
Note: At the end of the websites above, you can also find the instructions for the installation.
Assuming you don’t have any Oracle software or client installed, we first create the oracle directory in /opt. Open the terminal and type the command:
sudo mkdir /opt/oracle
Go to the oracle directory and move the downloaded files to it:
cd /opt/oracle
sudo mv ~/Downloads/instantclient-* .
Unzip each file and delete the zip files:
sudo unzip instantclient-basic-linux.x64-19.6.0.0.0dbru.zip
sudo unzip instantclient-sqlplus-linux.x64-19.6.0.0.0dbru.zip
sudo rm instantclient*.zip
The Instant Client on Linux require the libaio1 package. Install using the command:
sudo apt update && sudo apt install libaio1
If the Instant Client is the only Oracle Software installed on your system, update the runtime link path using the commands below. This is the fifth step in the Oracle installation process described on the Oracle webpage mentioned above. Check the page if the Instant Client is not the only Oracle software installed.
sudo sh -c "echo /opt/oracle/instantclient_19_6 > \
      /etc/ld.so.conf.d/oracle-instantclient.conf"
sudo ldconfig
To execute sqlplus from any directory, you need to add the directory of the Instant Client to .bashrc. The TNS_ADMIN environment variable is also required and I will also add the file tnsnames.ora to the Instant Client folder, so I am assigning to this variable to the same instant client directory.
echo 'export PATH="$PATH:/opt/oracle/instantclient_19_6"' >> ~/.bashrc
echo 'export TNS_ADMIN="/opt/oracle/instantclient_19_6"' >> ~/.bashrc
source ~/.bashrc
If you don’t know the purpose of the file .bashrc, read this information at Unix & Linux Stack Exchange.
The last bit is to create or copy an existing tnsnames.ora file to the instant client directory. To create/edit, you can use your prefered editor (e.g. vi, nano, etc.). In my case, I prefer the old and powerful vi.
sudo vi /opt/oracle/instantclient_19_6/tnsnames.ora
After adding the databases addresses to the tnsnames.ora file, you should be able to access your database using sqlplus.

2 - Utilities and Scripts to Export Data to CSV Files
In this second part, you will find different ways to save data in CSV files. Some simple methods may work with certain data, but they can cause problems with others. A recommended way to save data in CSV files is to ensure that you use both the column delimiter (e.g. comma) and a text delimiter (e.g. quotation marks).
2.1 - Exporting From SQL Server to CSV Files
There are two simple ways to export data from SQL Server to CSV files from command line. One way is to use the sqlcmd Utility that we showed above, but the mssql-tools we installed on Windows and Linux includes another tool called bcp Utility (command: bcp) which is designed to do bulk exports (and also imports).
Each utility (sqlcmd and bcp) has its own strengths, but for this type of extraction the sqlcmd is my favorite. I will let the reader decide which tool to use.
I’ll show you some examples of how to export data to a CSV file using each tool. The commands provided in this section run the same way on Linux and on Windows.
SQLCMD Utility
The first script command is:
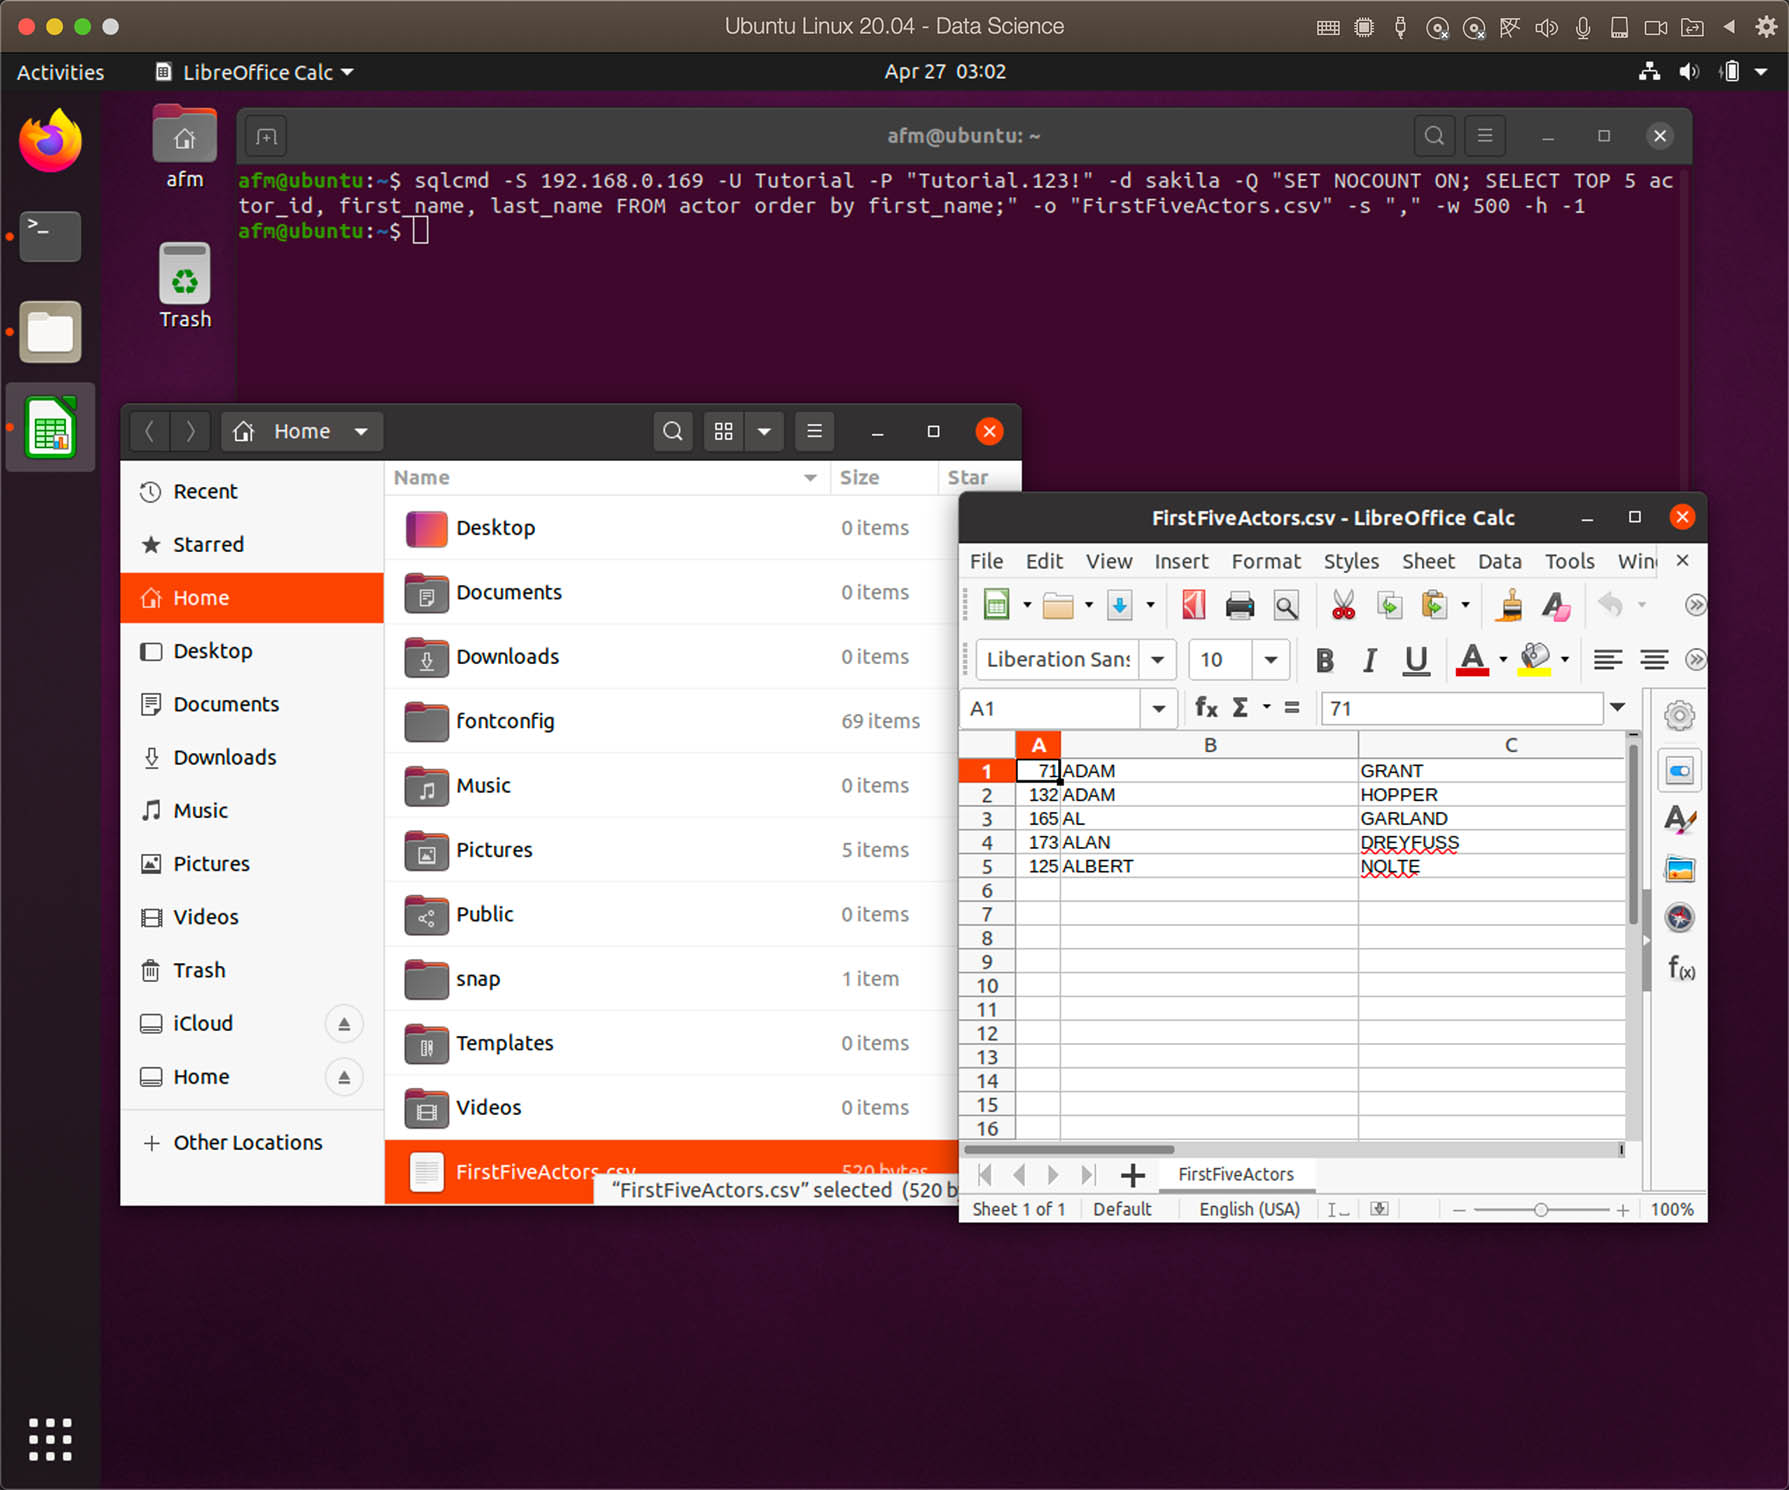
sqlcmd -S 192.168.0.169 -U Tutorial -P "Tutorial.123!" -d sakila -o "FirstFiveActors.csv" -s "," -w 500 -h -1 -Q "SET NOCOUNT ON; SELECT TOP 5 actor_id, first_name, last_name FROM actor order by first_name;"
Some of the switches are trivial. If you not familiar with sqlcmd, check the help to understand all the switches:
sqlcmd -?
The less used switches which I used above are:
| Switch | Description |
|---|---|
| -o “FirstFiveActors.csv” | Output to the file called FirstFiveActors.csv |
| -s “," | Column Separator set to comma |
| -w 500 | Row width set to 500 chars |
| -h -1 | Removes the column headers |
I also added SET NOCOUNT ON; at beginning of the query to prevent the row count from appearing at the end of the file (Read: SET NOCOUNT). You can remove and see the output file.
The result in LibreOffice Calc:
The column header is often required, but if we remove the switch -h -1, the file will contain some dashed lines that may not be desired:
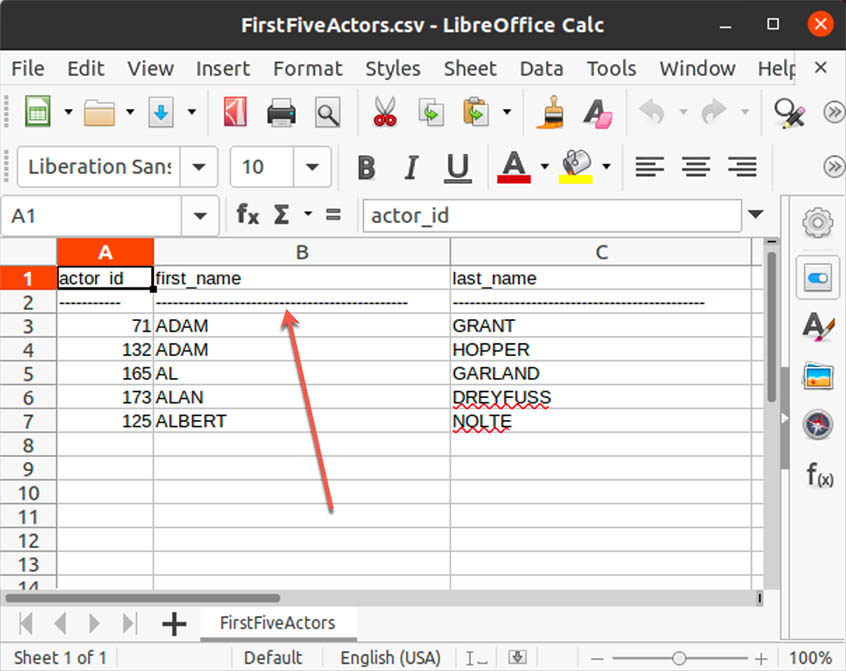
A workaround is to remove the column header using the switch -h -1, add the column header manually as a row in another query and use UNION ALL.
SET NOCOUNT ON;

SELECT 'actor_id' AS actor_id, 'first_name' AS first_name,
       'last_name' AS last_name
UNION ALL
SELECT actor_id, first_name, last_name FROM
   ( SELECT TOP (5) STR(actor_id) AS actor_id, first_name, last_name FROM actor
     ORDER BY first_name, last_name
   ) tmp
Converting numbers, date and other columns types to string is not a problem, because we are saving to a text file anyway. When running the script above, the result may appear as expected (“header” row on top), however, in SQL Server there is NO GUARANTEE for any kind of order, unless you use ORDER BY (Read: SELECT - ORDER BY Clause).
To guarantee the desired result, we must add an ORDER BY to determine the order in which the result is presented.
SET NOCOUNT ON;

SELECT actor_id, first_name, last_name FROM (
  SELECT 1 AS row_num, 'actor_id' AS actor_id, 'first_name' AS first_name,
        'last_name' AS last_name
  UNION ALL
  SELECT TOP 5
   ROW_NUMBER() OVER (
	ORDER BY first_name
   ) + 1 AS row_num,
   STR(actor_id) AS actor_id, first_name, last_name FROM actor
) tmp
ORDER BY row_num
The script above is just to explain a way around the ORDER BY and using a single script with UNION ALL. But when you export to a file using sqlcmd, you can run several scripts. With that, the script below has the same result as the script above.
  SET NOCOUNT ON;

  SELECT 1 AS row_num, 'actor_id' AS actor_id, 'first_name' AS first_name,
        'last_name' AS last_name;

  SELECT actor_id, first_name, last_name FROM
   ( SELECT TOP (5) STR(actor_id) AS actor_id, first_name, last_name FROM actor
     ORDER BY first_name, last_name
   );
Since the scripts can be large, we should save the script to a file. The above script was saved in the file FirstFiveActors.sql (Don’t forget to add SET NOCOUNT ON; at beginning of the query).
Using the input file switch -i we have:
sqlcmd -S 192.168.0.169 -U Tutorial -P "Tutorial.123!" -d sakila -i "FirstFiveActors.sql" -o "FirstFiveActors.csv" -s "," -w 500 -h -1

Looking at the CSV file using a text editor, we see that there is no text delimiter. In case any of the text fields would contain a comma, the outcome would be different when opening the file in Excel or LibreOffice Calc. Here a simulation of this scenario:
SET NOCOUNT ON;

SELECT actor_id, first_name, last_name FROM (
  SELECT 1 AS row_num, 'actor_id' AS actor_id, 'first_name' AS first_name,
        'last_name' AS last_name
  UNION ALL
  SELECT TOP 5
   ROW_NUMBER() OVER (
	ORDER BY first_name
   ) + 1 AS row_num,
   STR(actor_id) AS actor_id,
        IIF(actor_id = 132, 'ADAM,TEXT', first_name) as first_name,
    last_name FROM actor
) sub
ORDER BY row_num;

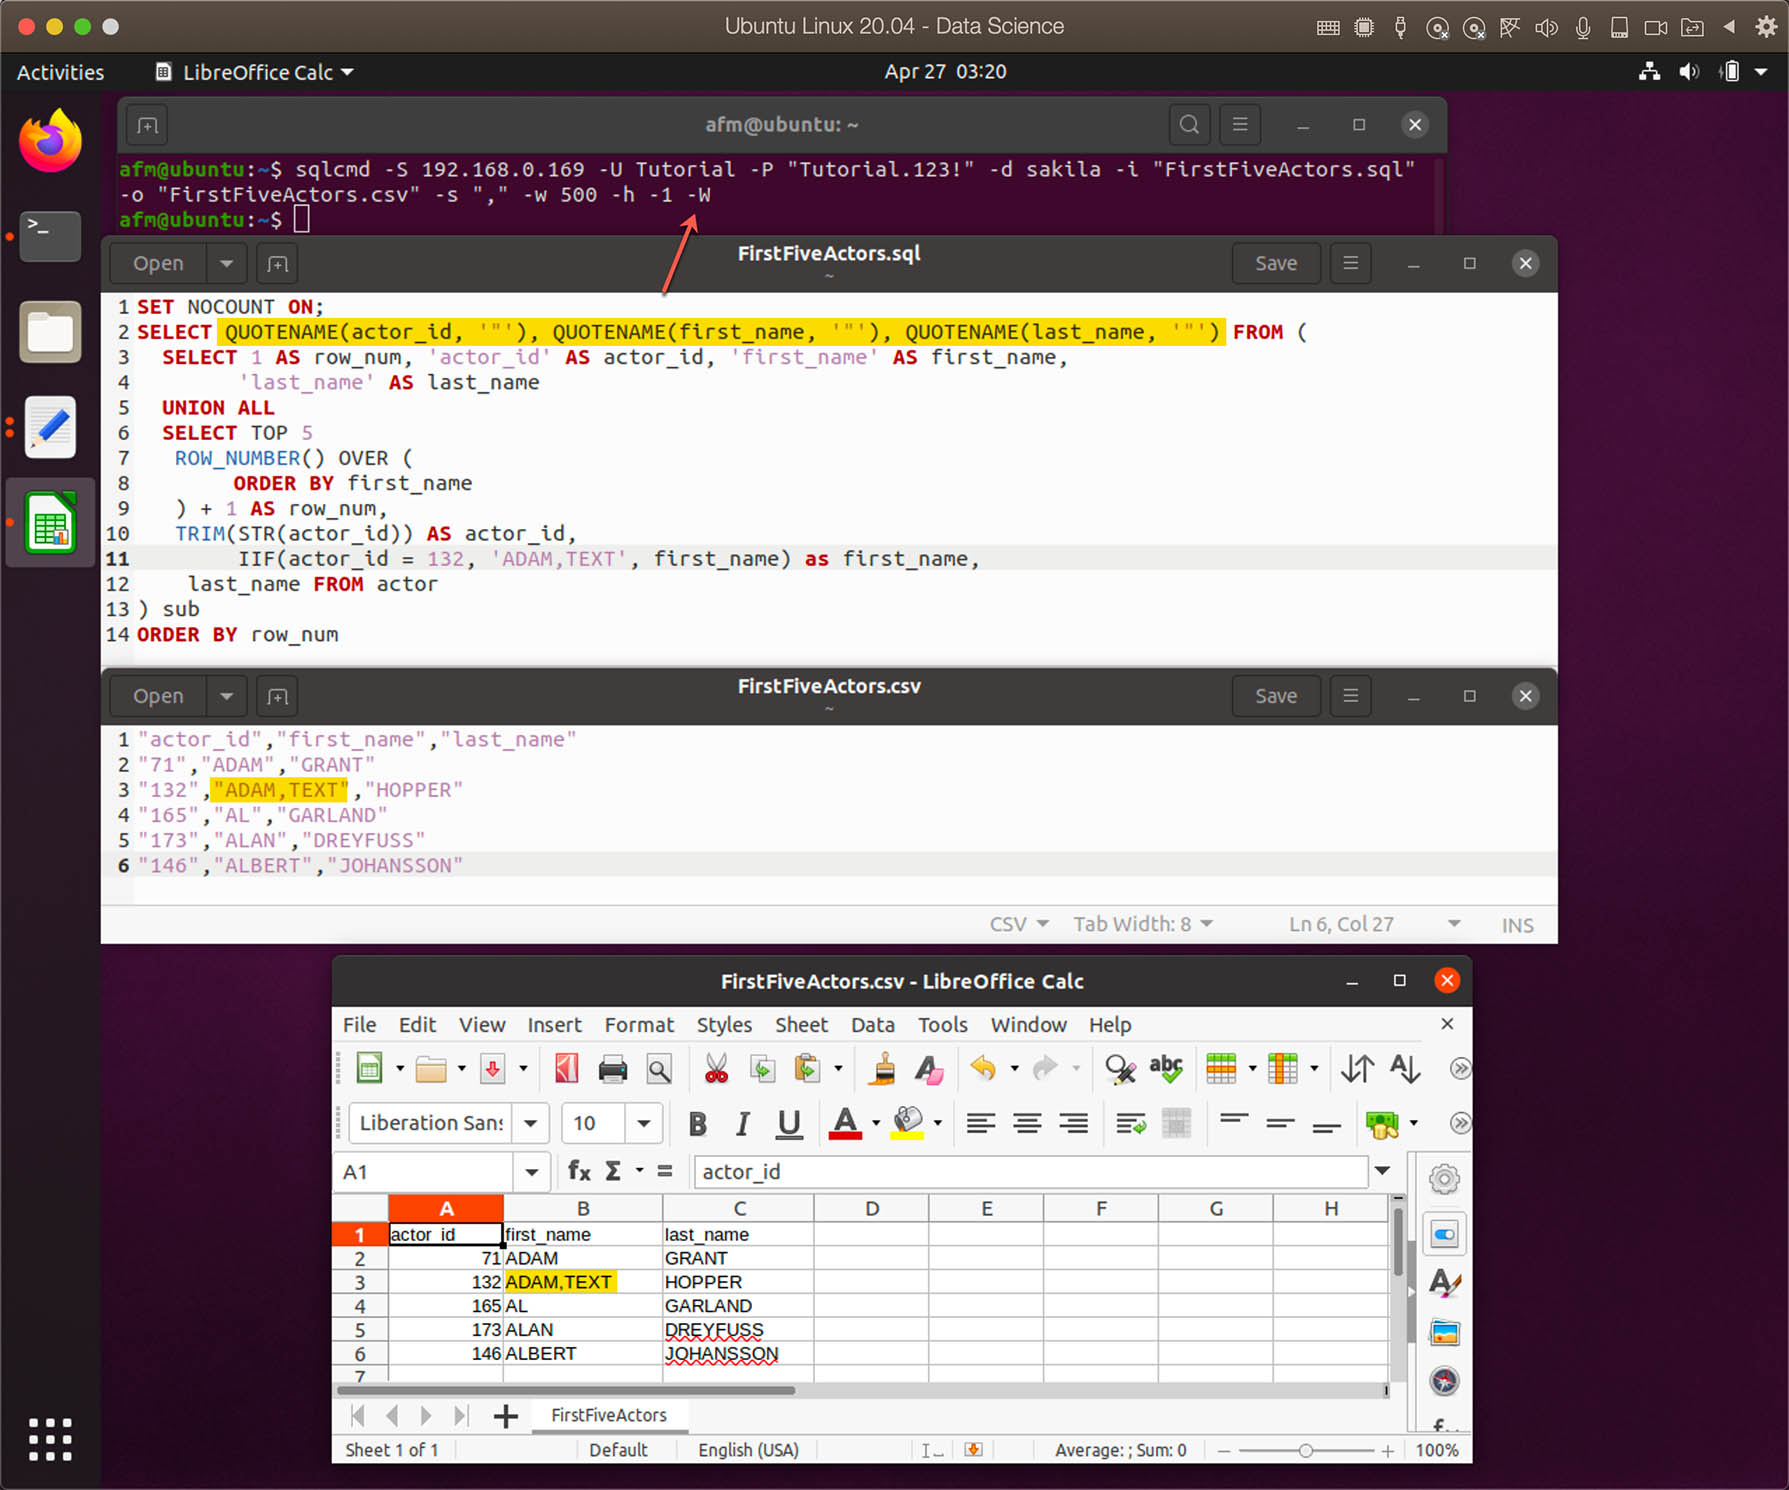
As mentioned before, a recommended way to save data in CSV files is to ensure that you use both the column delimiter (e.g. comma) and a text delimiter (e.g. quotation marks). A solution to the above case would be:
SET NOCOUNT ON;

SELECT QUOTENAME(actor_id, '"'), QUOTENAME(first_name, '"'), QUOTENAME(last_name, '"') FROM (
  SELECT 1 AS row_num, 'actor_id' AS actor_id, 'first_name' AS first_name,
        'last_name' AS last_name
  UNION ALL
  SELECT TOP 5
   ROW_NUMBER() OVER (
	ORDER BY first_name
   ) + 1 AS row_num,
   TRIM(STR(actor_id)) AS actor_id,
        IIF(actor_id = 132, 'ADAM,TEXT', first_name) as first_name,
    last_name FROM actor
) sub
ORDER BY row_num;
To execute the script above, I also suggest to add the switch -W to remove the trailing spaces.
sqlcmd -S 192.168.0.169 -U Tutorial -P "Tutorial.123!" -d sakila -i "FirstFiveActors.sql" -o "FirstFiveActors.csv" -s "," -w 500 -h -1 -W
BCP Utility
The bulk copy program utility (bcp) bulk copies data between an instance of Microsoft SQL Server and a data file in a user-specified format. The bcp utility can be used to import large numbers of new rows into SQL Server tables or to export data out of tables into data files.
Source: Microsoft Docs - bcp Utility
The bcp Utility syntax is described on the page above, but you can get a quick overview of the options using:
bcp -h
Something you need to know is that bcp cannot output the column headers and there is also no way to pass a script file as a parameter to bcp. As with sqlcmd, there is also no option (switch) for bcp to use text delimiter, you need to do this via script. Therefore, I suggest using the same approach to create a query as I showed above with the sqlcmd Utility.
Since you cannot pass a script file name as parameter to bcp, you must to write the table name or the script. For large script, it may be easier to use a view or procedure for this.
Here is an example using bcp.
bcp "select QUOTENAME(actor_id, '\"'), QUOTENAME(first_name, '\"'), QUOTENAME(last_name, '\"') from actor" queryout "FirstFiveActorsBCP.csv" -S "192.168.0.169" -U "Tutorial" -P "Tutorial.123!" -d "sakila" -c -t","
2.2 - Exporting From Oracle to CSV Files
Oracle’s command-line tool to access the database that can also be used to export data is called SQL*Plus, which I showed earlier how to install it.
Since the output file should have a column delimiter and a text delimiter for greater compatibility and to ensure programs read the data correctly, similar to SQL Server Utilities, we also need to make some special changes to the scripts to obtain the desired outcome.
To run the scripts, I will always use the same command below (Linux and Windows), changing only the file name of the script to be executed. The program, when executed using the /NOLOG argument, starts a session with no connection to a database. The second argument is the file name with the script that will also contain instructions for connecting to the database.
sqlplus /nolog @FirstFiveActorsORACLE.sql
The script file FirstFiveActorsORACLE.sql:
CONNECT tutorial/"Tutorial.123!"@XE

SET ECHO OFF
SET VERIFY OFF
SET HEADING OFF
SET TERMOUT OFF
SET FEEDBACK OFF
SET TAB OFF
SET PAUSE OFF
SET UNDERLINE OFF
SET TRIMSPOOL ON
SET TIMING OFF
SET LINESIZE 1000
SET PAGESIZE 0

SPOOL FirstFiveActors.csv

SELECT '"actor_id","first_name","last_name"' as header FROM dual;

SELECT '"'|| actor_id   ||'","'||
             first_name ||'","'||
             last_name
       ||'"' FROM
  (
     SELECT TO_CHAR(actor_id) AS actor_id, first_name, last_name FROM sakila.actor ORDER BY first_name, last_name
  )  WHERE ROWNUM <= 5;

SPOOL OFF
EXIT;
The first line is to tell SQL*Plus to connect to database. After that I am setting some system variables using the command SET.
SET sets a system variable to alter the SQL*Plus environment settings for your current session.
Source: Oracle Docs
For detailed information about the system variables, please check the SET System Variable Summary at Oracle’s Database Release 19 User’s Guide and Reference.
After the SET commands, there is a command called SPOOL that is used to direct the output to a flat file. To stop directing the output to the file, use the SPOOL OFF command.
The script is similar to what we did on SQL Server. We output the header first and the data later as a large character string.
The scripts presented for SQL Server and Oracle were very simple. I suggest checking how the output files are displayed in Excel (or LibreOffice Calc) to verify that all columns and rows have the desired result. For example, I would highly recommend formatting the datetime data type with something like:
...
TO_CHAR(your_datetime_column,'DD/MM/YYYY HH24:MI:SS'), -- Oracle
...
Or you can define the SQL*Plus session to display the datetime columns using a different format with the command:
ALTER SESSION SET NLS_DATE_FORMAT = 'DD/MM/YYYY HH24:MI:SS';
3 - Scheduling Tasks
This section will be a little shorter, as scheduling tasks on Windows and Linux is quite simple. On Windows, we will use Task Scheduler and, on Linux, cron, which is a job scheduler in Unix-like computer operating systems.
2.1 - Windows Task Scheduler
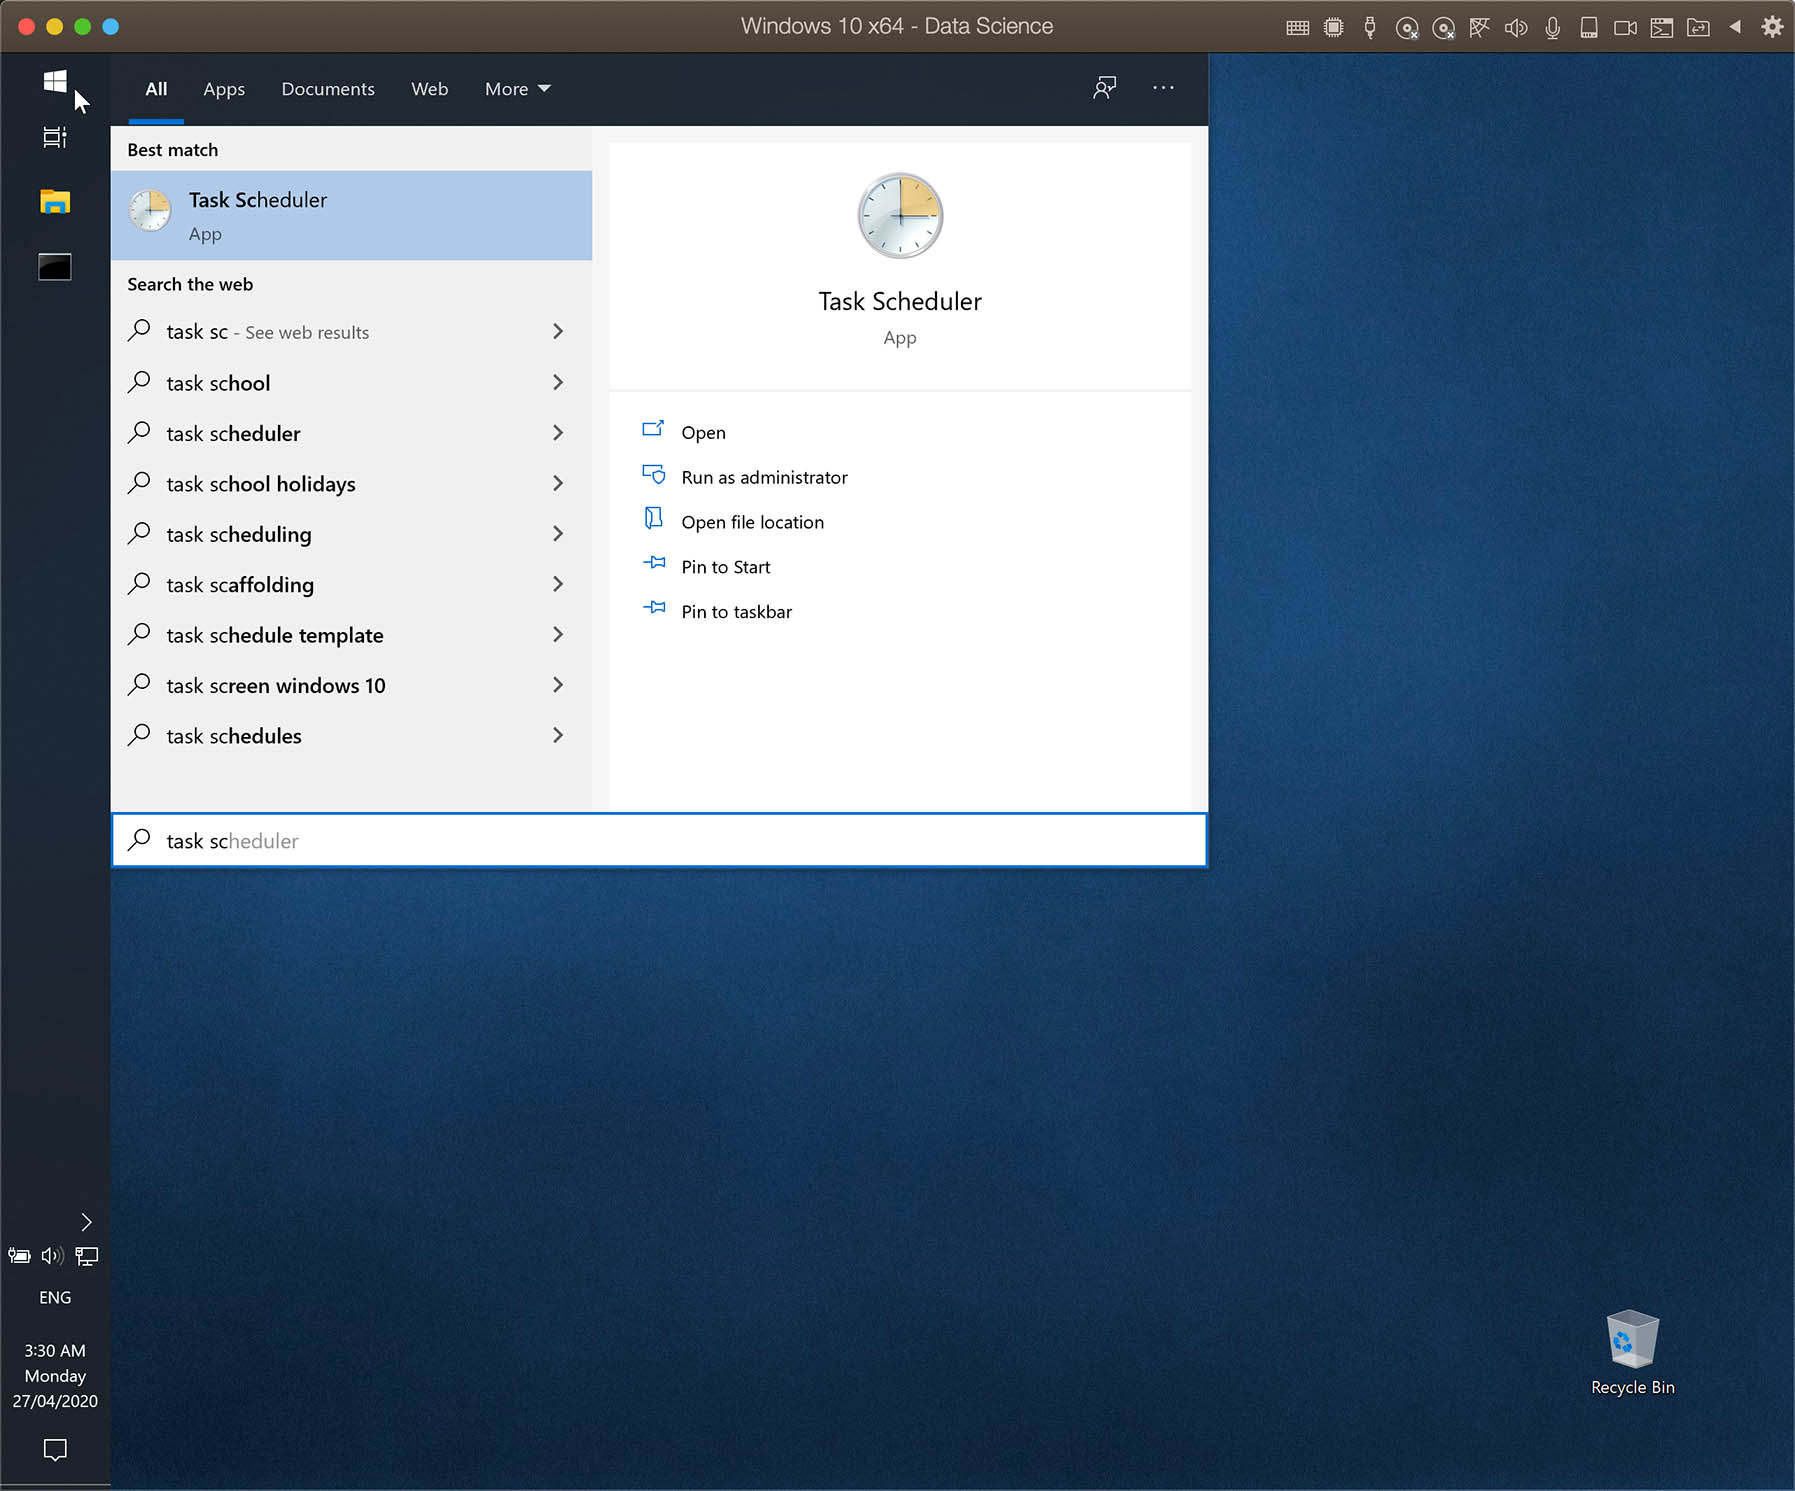
To open the Task Scheduler on Windows, click the Start button and start typing “Task Scheduler” until the application appears, and click on it to open.
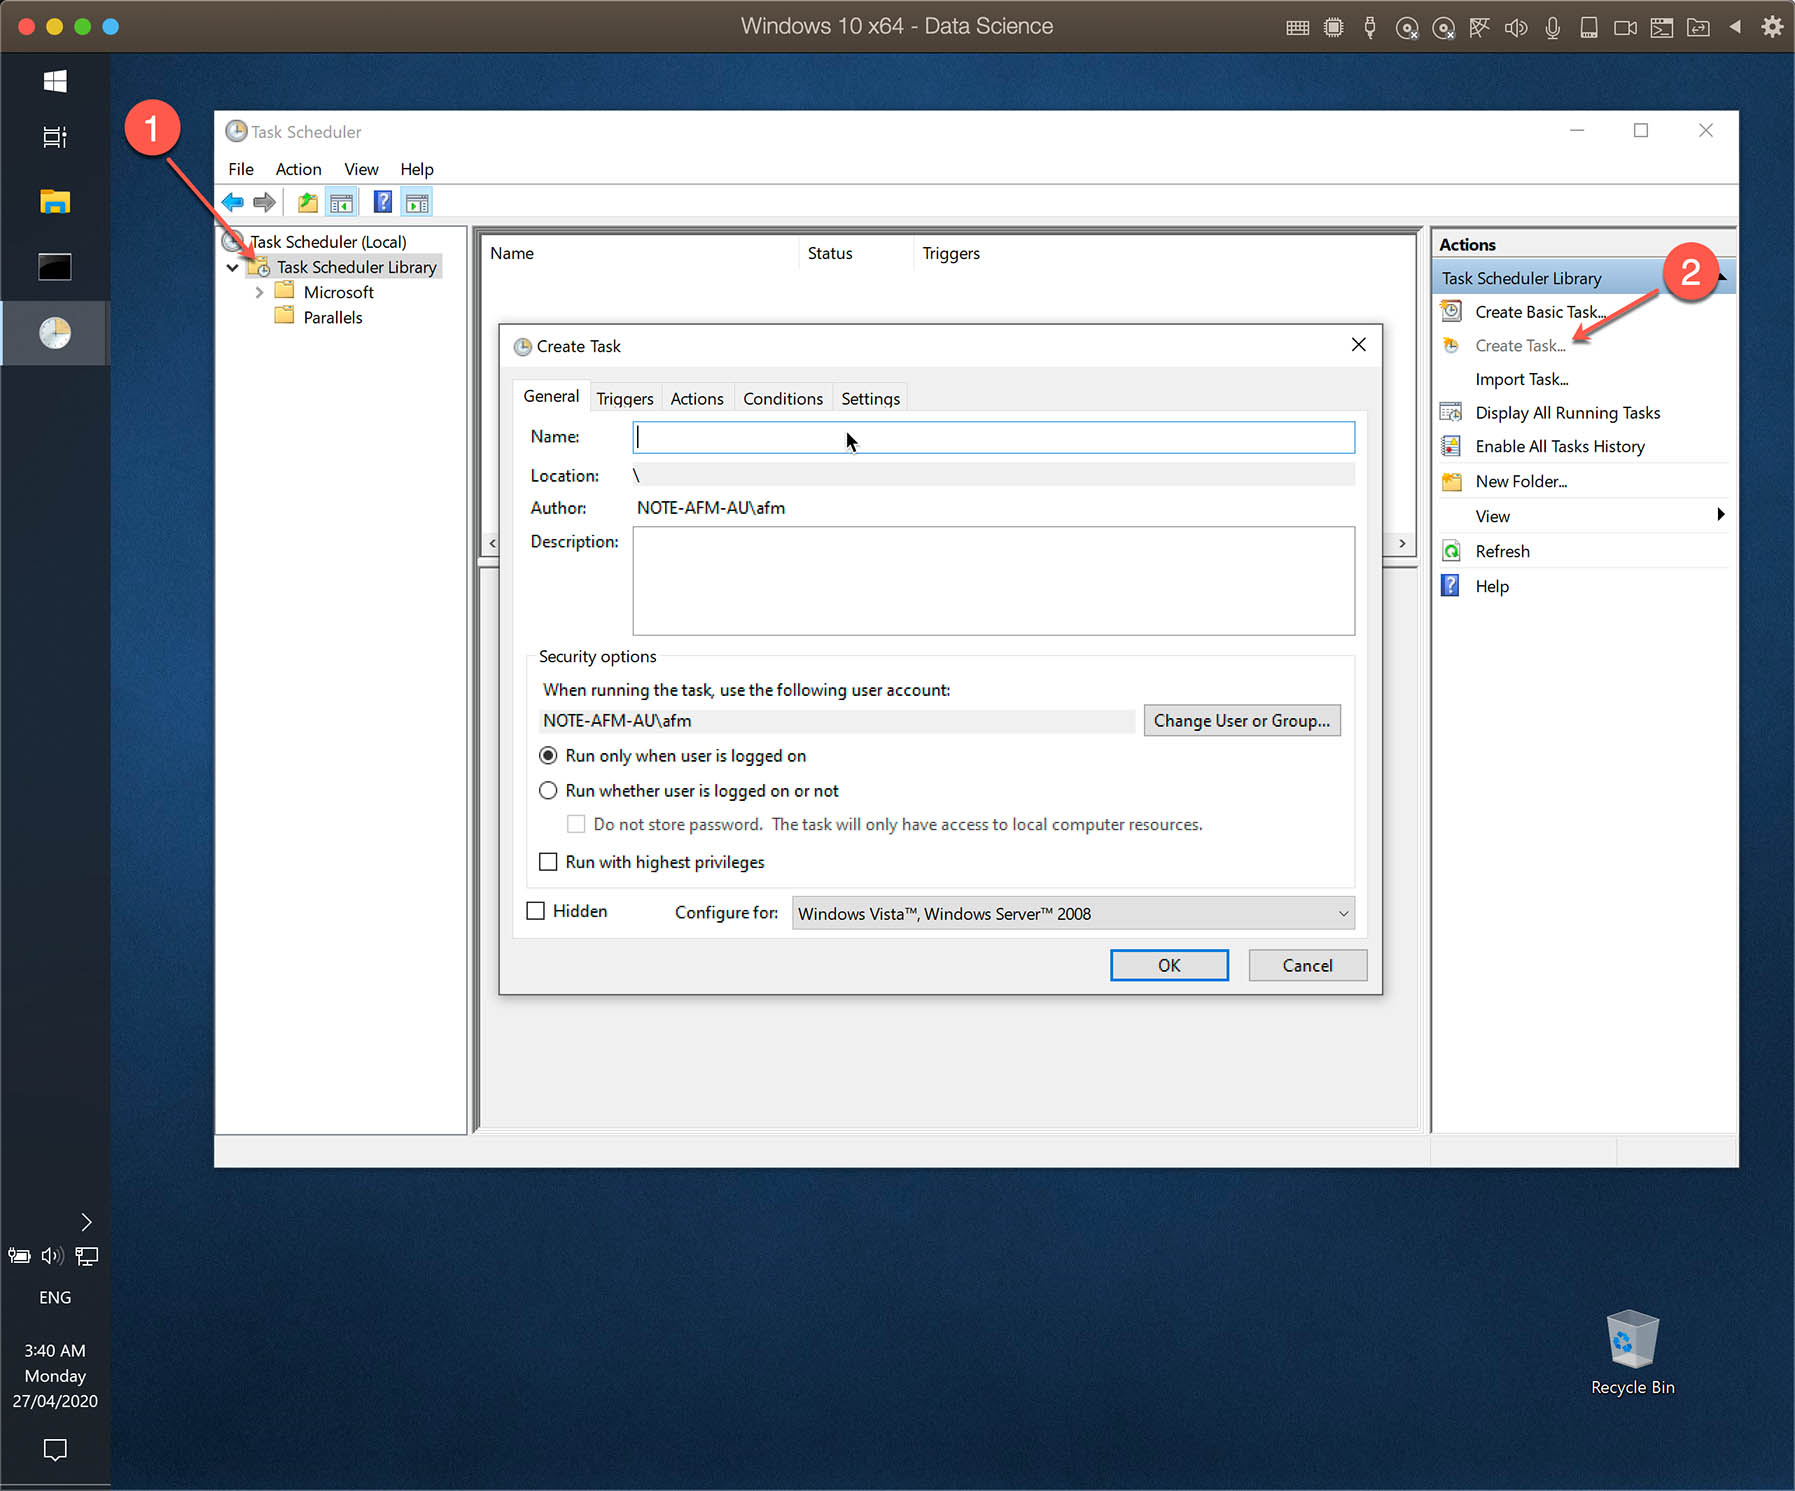
Clicking on Task Scheduler Library, you might see already some tasks added automatically by other applications.
At the right side of this application you will see a section called Actions where you have some options. Instead using “Create Basic Tasks…", I recommend using “Create Task…” as it offers more options to schedule a tasks.
Below the steps required to add a task to execute one of the tools from section 2 (sqlcmd or sqlplus).
- Write down a name for your task
- Select a user account to run the task
- If you want to run while no one is logged in, select this option “Run whether user is logged on or not”
- Depending on the task, it may be necessary to run using highest privileges (as an Administrator)
- Click on “Triggers” (Don’t click on OK yet)
- Click on “New…” to select a trigger to execute the task. I left the default option “On a schedule”
- Depending on the required interval, adjust the settings (One time, Daily, etc.)
- Adjust the advanced settings, if necessary
- Click on “OK” to create the new trigger
- Click on “Actions”
- Click on “New…” to create an action
- Select the program or script to run. Notice that I created a batch file to run “sqlplus”
- Select a start directory. This is important because of the “sqlplus” input and output files
- Click on “Conditions” and change the settings if required
- Click on “Settings” and also change according to your needs
- As an example, I selected the option to stop the task if it has been running for more than 1h. However, this can stop the batch file, but not necessary the program executed within the batch file. This option might not always work as expect.
- Click on “OK” to complete the new task
- You will be asked to enter the password for the chosen user. Noitice that you cannot run a scheduler task from a user without password
- With the task created, I suggest testing by righ-clicking the task and clicking on “Run”
- After refreshing (F5), you will see the “Last Run Time” and, if successful, also the expected result

Instead creating the task using the Task Scheduler, you can also use schtasks. For details about schtasks, please read the schtasks page at Microsoft website.
2.1 - CRON on Linux
In this section I will just explain the basics of cron to execute the action we need (a shell script).
The software utility cron is a time-based job scheduler in Unix-like computer operating systems. Users that set up and maintain software environments use cron to schedule jobs (commands or shell scripts) to run periodically at fixed times, dates, or intervals. It typically automates system maintenance or administration—though its general-purpose nature makes it useful for things like downloading files from the Internet and downloading e-mail at regular intervals.
Source: Wikipedia
Before adding a job to cron, I will prepare and test the scripts (shell and SQL script) first.
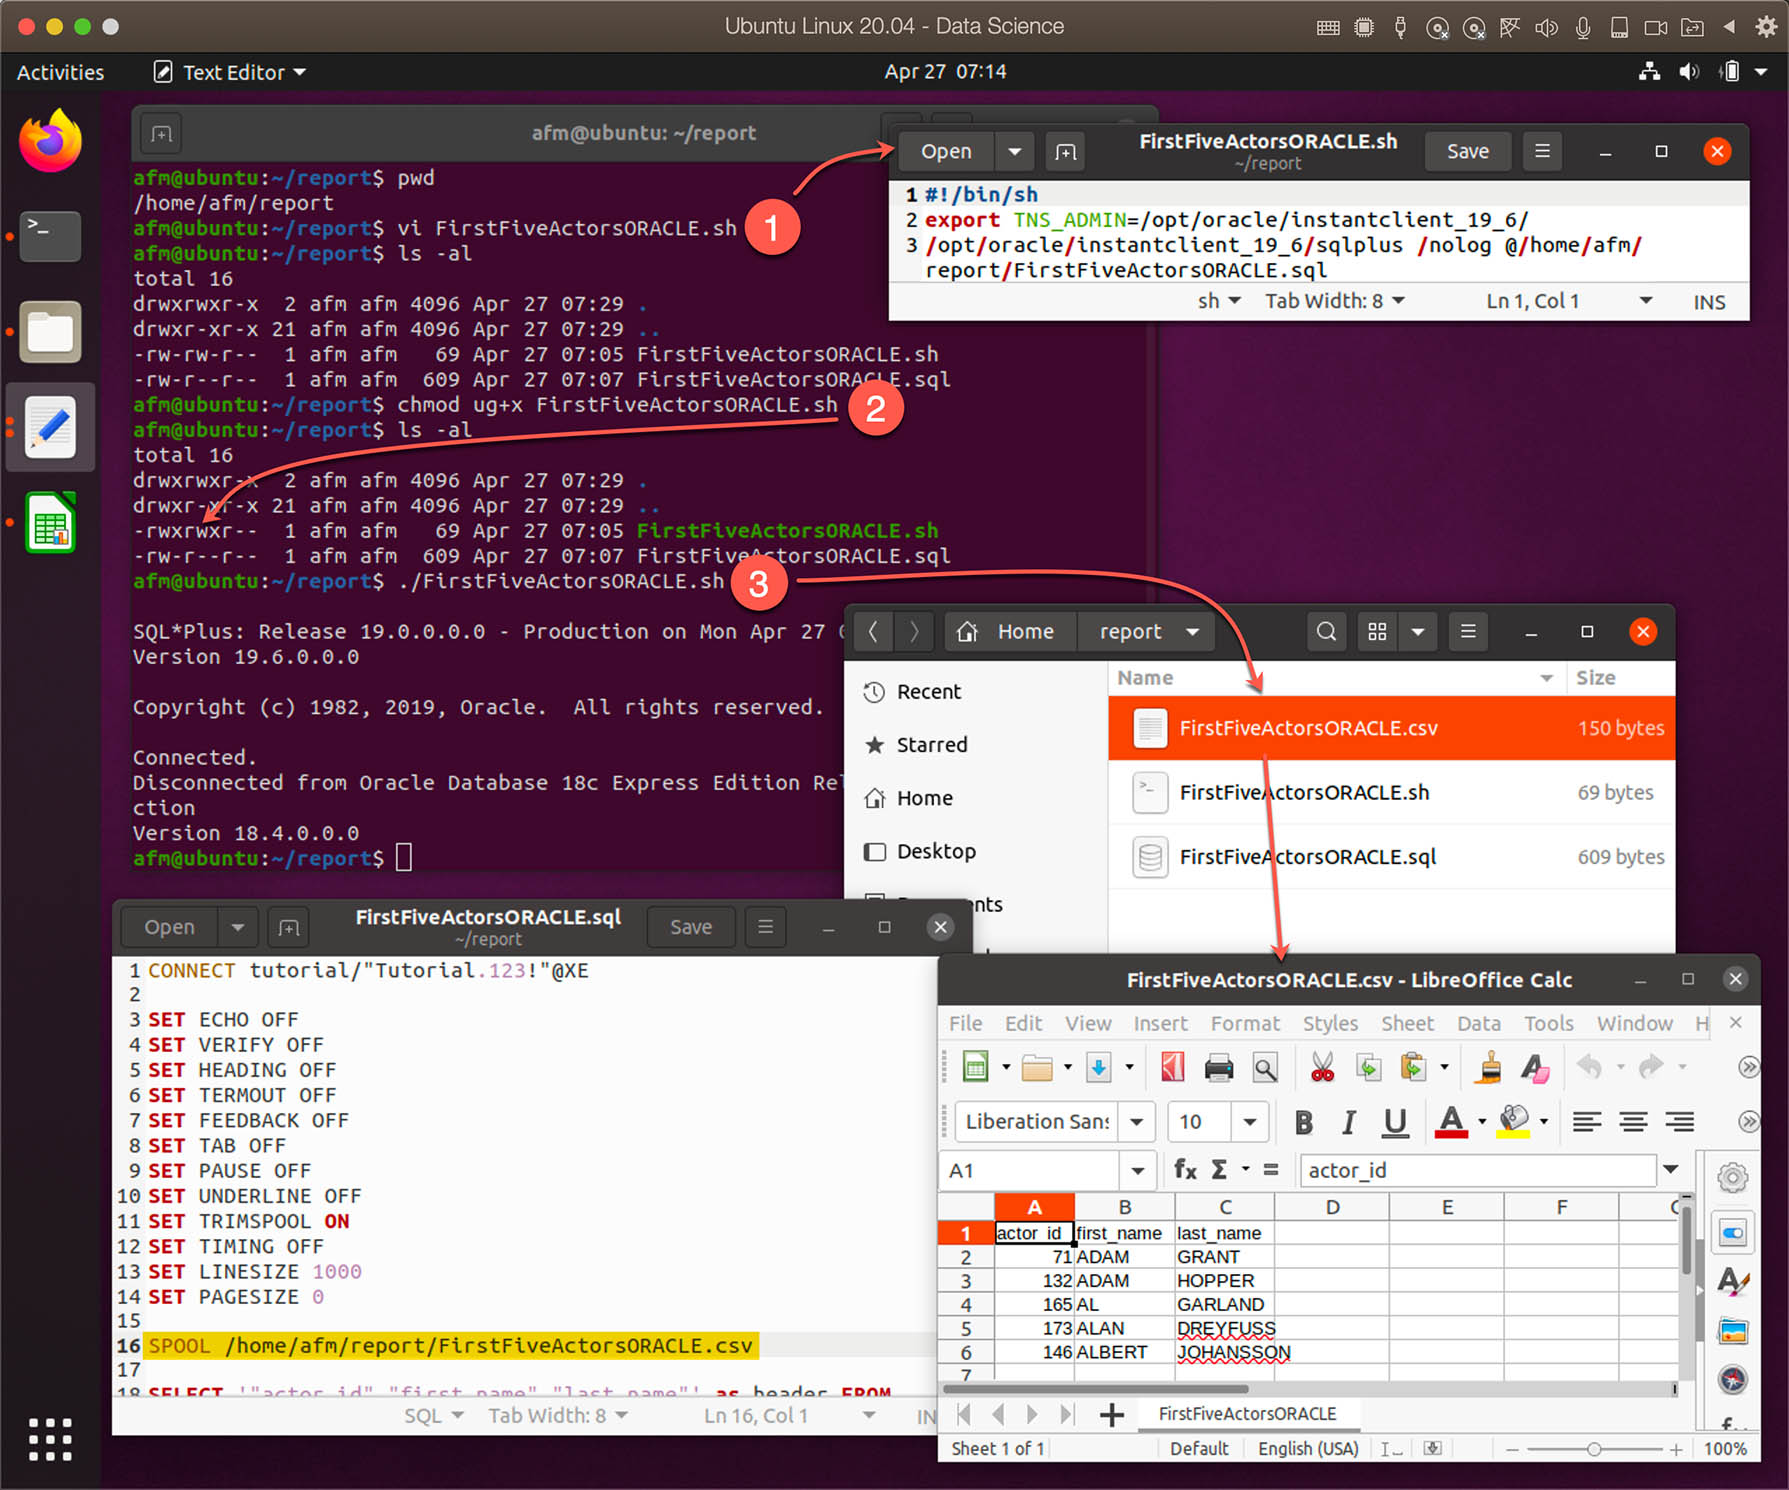
For this tutorial, I created a folder called report in the home directory (afm is my current user; /home/afm/report) and moved the file FirstFiveActorsORACLE.sql to it. I created a shell script file called FirstFiveActorsORACLE.sh using the vi editor and added the command to run sqlplus passing the name of the sql script file as a parameter. Then I gave the user and user group the permission to execute this script, and I run the script.
The file FirstFiveActorsORACLE.sh:
#!/bin/sh
export TNS_ADMIN=/opt/oracle/instantclient_19_6/
/opt/oracle/instantclient_19_6/sqlplus /nolog @/home/afm/report/FirstFiveActorsORACLE.sql
As we will create a cron job to run sqlplus, there are some important notes:
- Use the entire path to the sqlplus application, otherwise cron will not run sqlplus
- Also use the entire path of the SQL query file and for the output file (.csv)
- Add the path to TNS_ADMIN within your bash script (See image below). Even with this path defined in .bashrc, cron will not use it. Without defining TNS_ADMIN in your bash script, you may have a connection error: “SP2-0640: Not connected”. I will update the post the in future if I identify the missing configuration.
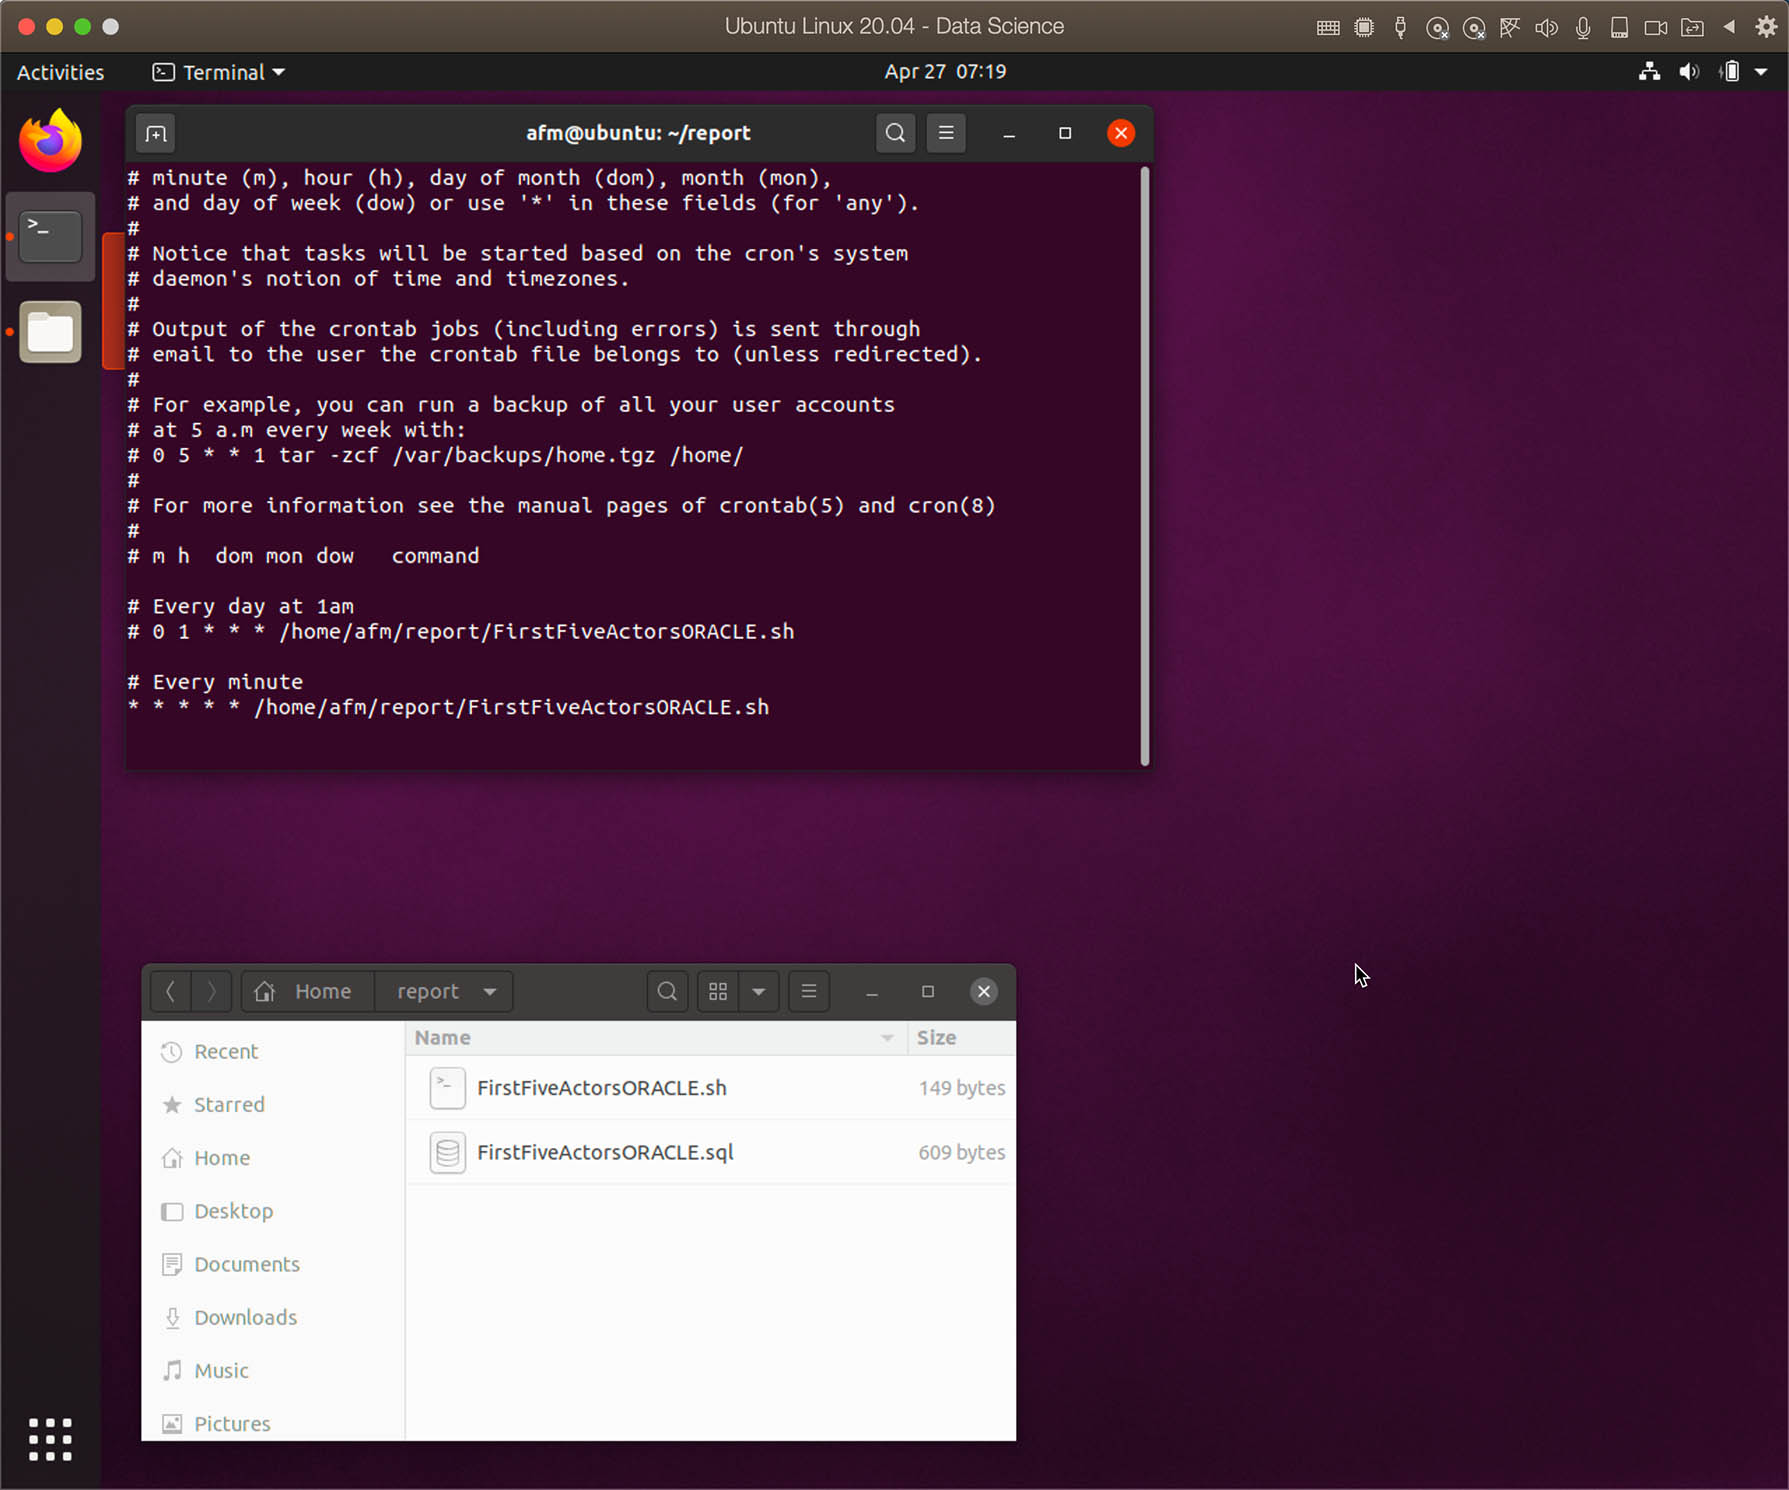
To add/edit cron tasks, use the command:
crontab -e
I added following lines:
# Every day at 1am
# 0 1 * * * /home/afm/report/FirstFiveActorsORACLE.sh

# Every minute
* * * * * /home/afm/report/FirstFiveActorsORACLE.sh
Lines beginning with # are comments. For testing purposes, I chose to run every minute. To familiarize yourself with the cron syntax, see the website crontag.guru.

To export from SQL Server using sqlcmd and cron, we follow the same recommendations as with sqlplus.
We create a batch file called FirstFiveActorsSQLServer.sh to run sqlcmd. Remember to use the entire path.
#!/bin/sh
/opt/mssql-tools/bin/sqlcmd -S 192.168.0.169 -U Tutorial -P "Tutorial.123!" -d sakila -i "/home/afm/report/FirstFiveActorsSQLServer.sql" -o "/home/afm/report/FirstFiveActorsSQLServer.csv" -s "," -w 500 -h -1 -W
Just add a new entry in cron table to run this bash script.

4 - Send E-Mails and Attaching a File
There are a few ways to send an e-mail, the most used is through a SMTP server, but there are also some e-mail services (e.g. mailchimp) that provide an API for sending e-mails. I decided to use the simple SMTP and, in my case, I will use the mail server package installed on my NAS. If you do not have an SMTP server, using Google, you will find some free SMTP servers that can be used.
4.1 - Sending E-mails on Windows
Many years ago I used a command line utility called Blat, but today I use PowerShell.
Here a two posts with examples of how to send e-mails with attachment using PowerShell: Tech Wizard and Cloud Security.
Here is the script to send the e-mail using PowerShell (File: sendemail.ps1).
function SendMail {
# Defining Variables
$EmailFrom = "noreply@your_own_domain.com"
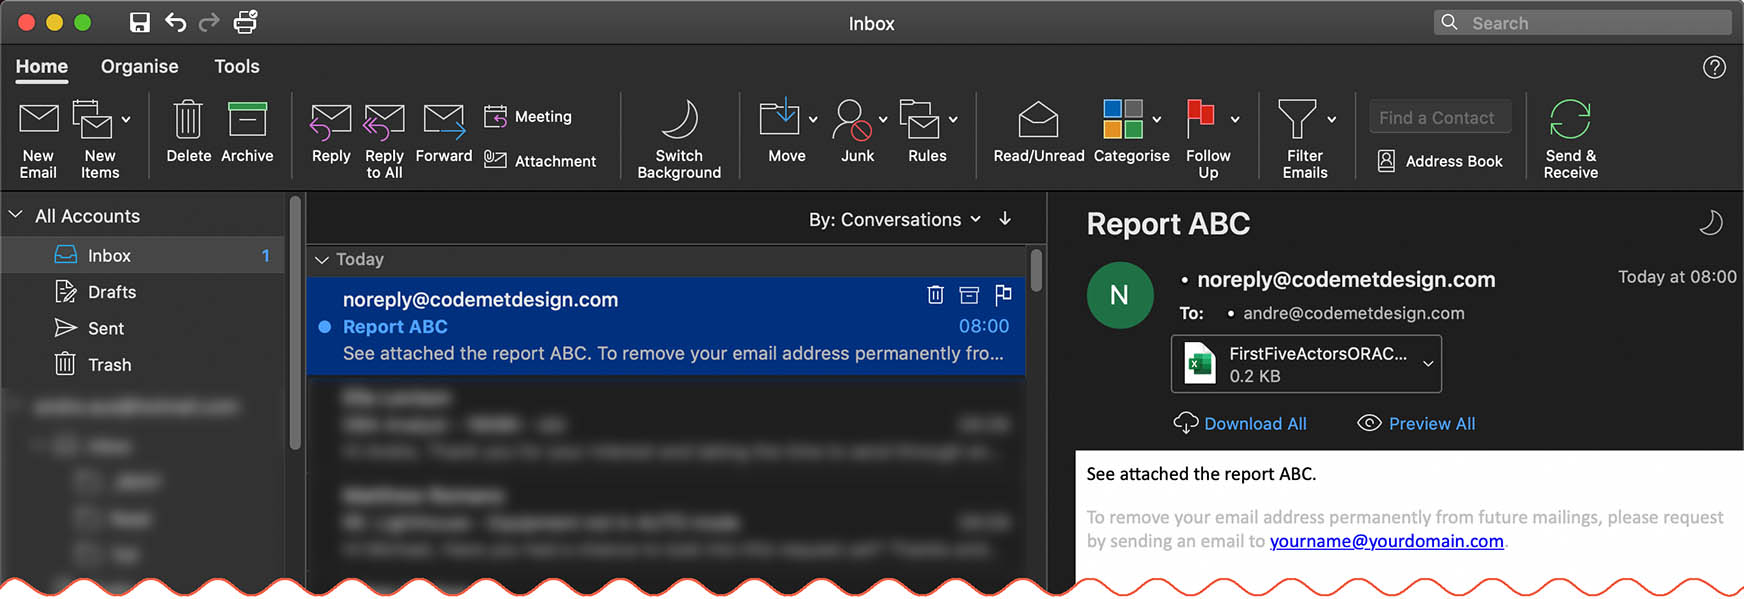
$EmailSubject = "Report ABC"
$smtpServer = "192.168.0.1"
$SendTo = "name@your_own_domain.com"
$ReportFilename = "C:\reports\FirstFiveActorsORACLE.csv"
# Adding Report File
$attReportFile = new-object Net.Mail.Attachment($ReportFilename)
$attReportFile.ContentId = "FileAttachment"
# More information on Mailmessage on http://technet.microsoft.com/en-us/library/dd347693.aspx
$mailmessage = New-Object system.net.mail.mailmessage
# Add attachment to the mail
$mailmessage.Attachments.Add($attReportFile)
# Mail body
$body = "<p style='font-family: Calibri, sans-serif'>
See attached the report ABC.
</p>
<p style='font-family: Calibri, sans-serif;color:silver'>
To remove your e-mail address permanently from future mailings, please request by sending an e-mail to yourname@yourdomain.com.
</p>"
# Mail info
$mailmessage.from = $emailfrom
$mailmessage.To.add($sendto)
$mailmessage.Subject = $emailsubject
$mailmessage.Body = $body
$mailmessage.IsBodyHTML = $true
$SMTPClient = New-Object Net.Mail.SmtpClient($SmtpServer, 25)
$SMTPClient.Send($mailmessage)
# Dispose attachments
$attReportFile.dispose()
}
# Executing the data extraction
sqlplus /nolog "@FirstFiveActorsORACLE.sql"
# Sending the e-mail
SendMail

In case you have problems executing a PowerShell script showing “Execution of scripts is disabled on this system.”, then check this post on stackoverflow.
To run this script in the Task Scheduler, add powershell for “Program/script:” and -File C:\Report\sendemail.ps1 as the “Add arguments (optional)". Just change the name of the file and path according to your script name and directory.

4.2 - Sending E-mails on Linux
On Linux, you can configure to use an external SMTP server or, for example, install Postfix and send e-mails using your own linux. For more information on installing and configuring Postfix, read this article.
I will be using ssmtp and curl to send the e-mail.
ssmtp is a send-only sendmail emulator for machines which normally pick their mail up from a centralized mailhub (via pop, imap, nfs mounts or other means).It provides the functionality required for humans and programs to send mail via the standard or /usr/bin/mail user agents.
Source: Ubuntu Manual - ssmtp
To use ssmtp, use the following command on the terminal to install:
sudo apt update
sudo apt install ssmtp mailutils
Note: The mailutils package may not be required, but I installed it, as it includes some useful command line tools.
As I am using a SMTP server installed on my NAS, the only change I made was to edit mailhub in the /etc/ssmtp/ssmtp.conf file.
Open the file using the vi editor (or your preferred one):
sudo vi /etc/ssmtp/ssmtp.conf
Search for mailhub and change to the IP address from your SMTP server.
To find out if you can send an e-mai successfully, run the following command on the terminal (adjust the e-mail address):
echo "Subject: Sendmail Test" | sendmail -v recipient@your_domain.com
Now we just need the right script to send an HTML e-mail with an attachment (using curl). The script below is not very small and may not be easy to understand, as it creates an e-mail in MIME format. There are some comments that explain parts of the script. I suggest using the script below and then making changes. You should only change path to the files and also the e-mail sender from sender and receiver (from and to). Just be mindful that the output file must have a specific format. For example, if you remove an empty line before or after a base64 content, the same content (e.g. e-mail attachment) is unlikely to appear in your e-mail client correctly.
As I will be add this script to cron, I am calling the previously prepared script at the beginning.
File sendreport.sh:
#!/bin/bash

# Exporting data
/home/afm/report/FirstFiveActorsSQLServer.sh

# Big part of the script is from:
# https://stackoverflow.com/questions/44728855/curl-send-html-email-with-embedded-image-and-attachment
# https://stackoverflow.com/questions/42859279/curl-mail-attachment-imagines-exe-file-rar-zip-files

rtmp_url="smtp://192.168.0.2"
# rtmp_url="smtp://smtp.gmail.com:587"
rtmp_from="someone@from_domain.com"
rtmp_to="recipient@to_domain.com"
# rtmp_credentials="sender@gmail.com:secretpassword"

# Temporary file used to store whole email content
file_upload="/home/afm/report/data.eml"

#mail_from="Name From <$rtmp_from>"
mail_from="$rtmp_from <$rtmp_from>"
#mail_to="You can use a name here <$rtmp_to>"
mail_to="$rtmp_to <$rtmp_to>"
mail_subject="Report ABC - $(date '+%d/%m/%Y %H:%M:%S')"
mail_reply_to="$rtmp_from <$rtmp_from>"
mail_cc=""

# Function add_file()
# $1 : type (ex : image/png)
# $2 : image content id filename (match the cid:filename.png in html document)
# $3 : image content base64 encoded
# $4 : filename for the attached file if content id filename empty
add_file() {
    echo "--MULTIPART-MIXED-BOUNDARY
Content-Type: $1
Content-Transfer-Encoding: base64" >> "$file_upload"

    if [ ! -z "$2" ]; then
        echo "Content-Disposition: inline
Content-Id: <$2>" >> "$file_upload"
    else
        echo "Content-Disposition: attachment; filename=$4" >> "$file_upload"
    fi
    echo "
$3

" >> "$file_upload"
}

# HTML message to send
message_base64=$(printf "<html>
<body>
    <div>
        <p style='font-family: Calibri, sans-serif'>
        See attached the report ABC.
        </p>
        <p style='font-family: Calibri, sans-serif;color:silver'>
        To remove your e-mail address permanently from future mailings, please request by sending an e-mail to yourname@yourdomain.com.
        </p>
    </div>
</body>
</html>" | base64)

# Initial part of the e-mail (MIME FORMAT)
echo "From: $mail_from
To: $mail_to
Subject: $mail_subject
Reply-To: $mail_reply_to
Cc: $mail_cc
MIME-Version: 1.0
Content-Type: multipart/mixed; boundary=\"MULTIPART-MIXED-BOUNDARY\"

--MULTIPART-MIXED-BOUNDARY
Content-Type: multipart/alternative; boundary=\"MULTIPART-ALTERNATIVE-BOUNDARY\"

--MULTIPART-ALTERNATIVE-BOUNDARY
Content-Type: text/html; charset=\"utf-8\"
Content-Transfer-Encoding: base64
Content-Disposition: inline

$message_base64

--MULTIPART-ALTERNATIVE-BOUNDARY--

" > "$file_upload"

# Add Report text file
report_file=$(cat /home/afm/report/FirstFiveActorsSQLServer.csv | base64)
add_file "text/plain" "" "$report_file" "FirstFiveActorsSQLServer.csv"

# Add Report compressed (ZIP)
# report_file=$(cat /home/afm/report/FirstFiveActorsORACLE.zip | base64)
# add_file "application/octet-stream" "" "$report_file" "FirstFiveActorsSQLServer.zip"

# End of uploaded file(s)
echo "--MULTIPART-MIXED-BOUNDARY--" >> "$file_upload"


# Send e-mail
echo "Sending ...."
curl -s "$rtmp_url" \
     --mail-from "$rtmp_from" \
     --mail-rcpt "$rtmp_to" \
     -T "$file_upload" -k --anyauth \
#    --ssl -u "$rtmp_credentials" \
res=$?
if test "$res" != "0"; then
   echo "Sending failed with: $res"
else
    echo "OK"
fi

# Remove the temporary e-mail (data.eml)
rm -f $file_upload
After creating the bash script file, don’t forget to add a permission to execute:
chmod ug+x ./sendreport.sh
Because we want to send an automated e-mail with the exported file attached, add an entry to cron.
crontab -e
The crontab entry below will execute sendreport.sh every minute. Remember to change the interval later:
* * * * * /home/afm/report/sendreport.sh >> /home/afm/report/sendreport.log 2>&1
As there is an echo statement inside the script sendreport.sh, you might want to write those into a log file. And to do this, add the output and error redirection as shown below.
>> /home/afm/report/sendreport.log indicates that the standard output of the sendreport.sh script will add any output to the end of the log file.
2>&1 indicates that the standard error (2>) is redirected to the same file descriptor that is pointed by standard output (&1).
So, both standard output and error will be redirected to /home/afm/report/sendreport.log.


5 - Creating a Chart From CSV File and Adding to an E-mail
To create a chart from the exported data, I will use R. If you are not familiar with R, you might skip this part or, at least, check the enhanced scripts to send an e-mail with an image in the body of the e-mail. I intend to create future posts explaining how to install R and also many tutorials about it.
R is a programming language and free software environment for statistical computing and graphics supported by the R Foundation for Statistical Computing. The R language is widely used among statisticians and data miners for developing statistical software and data analysis
Source: Wikipedia
In order to generate a CSV file and use the data to create a chart, I created another simple script called PaymentAmount.sql (Sakila database in Oracle).
CONNECT tutorial/"Tutorial.123!"@XE

SET ECHO OFF
SET VERIFY OFF
SET HEADING OFF
SET TERMOUT OFF
SET FEEDBACK OFF
SET TAB OFF
SET PAUSE OFF
SET UNDERLINE OFF
SET TRIMSPOOL ON
SET TIMING OFF
SET LINESIZE 1000
SET PAGESIZE 0

SPOOL /home/afm/report/PaymentAmount.csv

SELECT '"DATE","AMOUNT"' as header FROM dual;

SELECT '"'|| TO_CHAR(TRUNC(payment_date),'YYYY/MM/DD') ||'","'|| TO_CHAR(sum(amount)) ||'"' FROM sakila.payment
 WHERE payment_date >= TO_DATE('27/07/2005', 'DD/MM/YYYY') AND
      payment_date < TO_DATE('03/08/2005', 'DD/MM/YYYY')
GROUP BY TRUNC(payment_date)
ORDER BY TRUNC(payment_date);

SPOOL OFF
EXIT;
The script to run sqlplus and process the above SQL script is the same as the one shown previously, I’m just using a new file name.
#!/bin/sh
export TNS_ADMIN=/opt/oracle/instantclient_19_6/
/opt/oracle/instantclient_19_6/sqlplus /nolog @/home/afm/report/PaymentAmount.sql
Below the R script PaymentAmount.R that opens the CSV file called PaymentAmount.csv, generates a simple bar chart and saves it to PaymentAmount.png:
# Opening library ggplot2 to plot charts. If you don't have the package, install using: install.packages('ggplot2')
library(ggplot2)
# Reading CSV File
data <- read.csv('/home/afm/report/PaymentAmount.csv')
# Preparing the plot
paymentPlot <- ggplot(data, aes(x=DATE,y=AMOUNT))
paymentPlot <- paymentPlot +
  geom_bar(stat="identity", fill = "#f05c41") +
  xlab("Date") +
  ylab("Amount (US$)") +
  ggtitle("Sakila - Payments from 27/07/2005 to 02/08/2005") +
  theme_bw() +
  theme(plot.title = element_text(size = 20))
# Printing the plot to PNG file
png('/home/afm/report/PaymentAmount.png', bg=NA, width=600, height=280)
print(paymentPlot)
dev.off()
With a small change to the script in the previous section, the one below sends an e-mail with the chart in the body of the e-mail and the CSV file as attachment. It calls the shell script to export the data and Rscript to generate the chart.
#!/bin/bash

# Exporting data
/home/afm/report/PaymentAmount.sh

# Generating Chart in R
/bin/Rscript /home/afm/report/PaymentAmount.R 2>&1 >> /dev/null

# Big part of the script is from:
# https://stackoverflow.com/questions/44728855/curl-send-html-email-with-embedded-image-and-attachment
# https://stackoverflow.com/questions/42859279/curl-mail-attachment-imagines-exe-file-rar-zip-files

rtmp_url="smtp://192.168.0.2"
# rtmp_url="smtp://smtp.gmail.com:587"
rtmp_from="noreply@your_domain.com"
rtmp_to="recipient@you_domain.com"
# rtmp_credentials="sender@gmail.com:secretpassword"


# Temporary file used to store whole email content
file_upload="/home/afm/report/data.eml"

#mail_from="Name From <$rtmp_from>"
mail_from="<$rtmp_from>"
#mail_to="You can use a name here <$rtmp_to>"
mail_to="<$rtmp_to>"
mail_subject="Sakila - Payment Amount Report"
mail_reply_to="$rtmp_from <$rtmp_from>"
mail_cc=""

# Function add_file()
# $1 : type (ex : image/png)
# $2 : image content id filename (match the cid:filename.png in html document)
# $3 : image content base64 encoded
# $4 : filename for the attached file if content id filename empty
add_file() {
    echo "--MULTIPART-MIXED-BOUNDARY
Content-Type: $1
Content-Transfer-Encoding: base64" >> "$file_upload"

    if [ ! -z "$2" ]; then
        echo "Content-Disposition: inline
Content-Id: <$2>" >> "$file_upload"
    else
        echo "Content-Disposition: attachment; filename=$4" >> "$file_upload"
    fi
    echo "
$3

" >> "$file_upload"
}

# HTML message to send
message_base64=$(printf "<html>
<body>
    <div>
        <p style='font-family: Calibri, sans-serif'>
        See attached the Sakila Payment Amount report.
        </p>
        <img src=\"cid:chart.png\">
        <p style='font-family: Calibri, sans-serif;color:silver'>
        To remove your e-mail address permanently from future mailings, please request by sending an e-mail to yourname@yourdomain.com.
        </p>
    </div>
</body>
</html>" | base64)

# Initial part of the e-mail (MIME FORMAT)
echo "From: $mail_from
To: $mail_to
Subject: $mail_subject
Reply-To: $mail_reply_to
Cc: $mail_cc
MIME-Version: 1.0
Content-Type: multipart/mixed; boundary=\"MULTIPART-MIXED-BOUNDARY\"

--MULTIPART-MIXED-BOUNDARY
Content-Type: multipart/alternative; boundary=\"MULTIPART-ALTERNATIVE-BOUNDARY\"

--MULTIPART-ALTERNATIVE-BOUNDARY
Content-Type: text/html; charset=\"utf-8\"
Content-Transfer-Encoding: base64
Content-Disposition: inline

$message_base64

--MULTIPART-ALTERNATIVE-BOUNDARY--

" > "$file_upload"

# Add Report text file
report_file=$(cat /home/afm/report/PaymentAmount.csv | base64)
add_file "text/plain" "" "$report_file" "PaymentAmount.csv"

chart_base64=$(cat /home/afm/report/PaymentAmount.png | base64)
add_file "image/png" "chart.png" "$chart_base64"

# End of uploaded file(s)
echo "--MULTIPART-MIXED-BOUNDARY--" >> "$file_upload"

# Send e-mail
echo "Sending ...."
curl -s "$rtmp_url" \
     --mail-from "$rtmp_from" \
     --mail-rcpt "$rtmp_to" \
     -T "$file_upload" -k --anyauth \
#    --ssl -u "$rtmp_credentials" \
res=$?
if test "$res" != "0"; then
   echo "Sending failed with: $res"
else
    echo "OK"
fi

# Remove the temporary e-mail (data.eml)
rm -f $file_upload


In PowerShell, it’s also simple to send an e-mail with an attachment and a chart:
function SendMail {
  # Defining Variables
  $EmailFrom = "noreply@your_domain.com"
  $EmailSubject = "Sakila - Payment Amount Report"
  $smtpServer = "192.168.0.2"
  $SendTo = "recipient@your_domain.com"
  $ReportFilename = "C:\reports\PaymentAmount.csv"
  $Chart = "C:\reports\PaymentAmount.png"

  # Adding Report File
  $attReportFile = new-object Net.Mail.Attachment($ReportFilename)
  $attReportFile.ContentId = "FileAttachment"

  # Embed Chart (image PNG)
  $attChart = new-object Net.Mail.Attachment($Chart)
  $attChart.ContentType.MediaType = "image/png"
  $attChart.ContentId = "ChartAttachment"


  # More information on Mailmessage on http://technet.microsoft.com/en-us/library/dd347693.aspx
  $mailmessage = New-Object system.net.mail.mailmessage

  # Add attachment to the mail
  $mailmessage.Attachments.Add($attReportFile)
  $mailmessage.Attachments.Add($attChart)

  # Mail body
  $body = "<p style='font-family: Calibri, sans-serif'>
  See attached the Sakila Payment Amount report.
  </p>
  <img src='cid:ChartAttachment'/>
  <p style='font-family: Calibri, sans-serif;color:silver'>
  To remove your e-mail address permanently from future mailings, please request by sending an e-mail to yourname@yourdomain.com.
  </p>"

  # Mail info
  $mailmessage.from = $emailfrom
  $mailmessage.To.add($sendto)
  $mailmessage.Subject = $emailsubject
  $mailmessage.Body = $body
  $mailmessage.IsBodyHTML = $true
  $SMTPClient = New-Object Net.Mail.SmtpClient($SmtpServer, 25)
  $SMTPClient.Send($mailmessage)

  # Dispose attachments
  $attReportFile.dispose()
}

# Executing the data extraction
sqlplus /nolog "@PaymentAmount.sql"

# Sending the e-mail
SendMail
6 - Creating an XLSX File From CSV File
I will be using R to generate a XLSX file from a CSV File because it is extremely simple. There are some packages in R to work with Excel files, and I will use openxlsx because it does not depend on Java like the xlsx package.
First on R, you need to install the openxlsx package:
install.packages('openxlsx')
The script to create the Excel file (.xlsx) is simple and commented for easy understanding.
# Opening library openxlsx
library(openxlsx)

# READING THE DATA AND FORMATING
# ------------------------------
# Reading CSV File
data <- read.csv('/home/afm/report/PaymentAmount.csv')
# Converting the date field to
data$DATE <- as.Date(data$DATE)

# PREPARING THE EXCEL FILE AND SAVING
# -----------------------------------
# Formating the date and number
options("openxlsx.dateFormat" = "dd/mm/yyyy")
options("openxlsx.numFmt" = "#,##0.00")

# Create the xlsx workbook and insert a worksheet
xlsxwb <- createWorkbook()
addWorksheet(xlsxwb, "Payments")
# Create a styles for the header and border and adding them
headerStyle <- createStyle(textDecoration="Bold",
                           fontColour = "white",
                           fgFill = "#f05c41",
                           valign = "center")
borderStyle <- createStyle(border = "TopBottomLeftRight")
addStyle(xlsxwb, "Payments", headerStyle, rows = 1, cols =
           1:ncol(data), gridExpand = TRUE)
addStyle(xlsxwb, "Payments", borderStyle, rows = 1:nrow(data)+1, cols =
           1:ncol(data), gridExpand = TRUE, stack = TRUE)
# Write data to the workbook
writeData(xlsxwb, "Payments", data, startRow = 1, startCol = 1)
# Set column widths
setColWidths(xlsxwb, "Payments", cols=1:ncol(data), widths = c(10, 12))
#Save Workbook
saveWorkbook(xlsxwb, "/home/afm/report/PaymentAmount.xlsx", TRUE)

If you don’t need all the formatting, you can use the simpler script:
# Opening library openxlsx
library(openxlsx)

# READING THE DATA AND FORMATING
# ------------------------------
# Reading CSV File
data <- read.csv('/home/afm/report/PaymentAmount.csv')
# Converting the date field to
data$DATE <- as.Date(data$DATE)

# WRITING EXCEL FILE
# ------------------
write.xlsx(data, "/home/afm/report/PaymentAmountSimple.xlsx")
Summary
After this long but detailed post, you will be able to send automated e-mails with database export in CSV and XLSX file format on Windows and Linux.
Let me know if you found the information useful, but also if you detect something that isn’t working for you, as I will try to help you or correct my post.